Showing posts with label thanksgiving. Show all posts

9.21.2016

$5 Fall Flannel DIY Coasters

My sisters live about 5 hours away from me, and I don't get to see them as much as I'd like, so I've found ways to keep us close--I thought we'd all do a $5 Fall Craft Challenge. It's just a fun thing we like to do. Their crafts are at the end of the post. I decided to make Fall Flannel Coasters, since fall officially begins tomorrow. These are just right for holding those yummy fall drinks and making everything all cozy. Here's how I made them:


You'll need:

  • flannel shirt (or flannel pajama pants)
  • coasters (square ones are easier to work with)
  • glue gun
  • scissors


You'll do:
  • I was originally going to make this with a sweater, but decided that was too bulk/fibers could melt, so I went with cozy flannel. Since I didn't have one I wanted to part with, I headed to Goodwill thrift store and grabbed one for a couple of bucks. They have them in the women, kid, and men's departments. You can also try pajama pants.
  • Next, I bought coasters. These were a little over a dollar. I wanted square ones since they would be easier to work with.
  • Place the coaster on the fabric (more hints in the video below) and cut out slightly larger than the flannel.

Then you'll add glue and place the fabric on top, smoothing out bumps. Flip over (as pictured) and glue to sides down. You can cut away the excess fabric if needed. You can see a demo of this in the video.


And that's it! Your DIY flannel coasters (made under $5) are ready for your favorite fall drink. I enjoyed mine out on my balcony. Here's a quick 2 minute video showing all of that--I'm really happy with how this came out, so I hope you watch:


And here's what my sisters made for their $5 Fall Craft Challenge:
My sister Jess took a curtain she found at Dollar General and turned it into slip covers (see the before and after above) and as panels on her entertainment center. She said she didn't sew them.


My sister Holly made this fall candle arrangement using materials she found at Dollar General: hurricane lamp, popcorn kernels (free), fall decorative leaves, and an orange ribbon!


What did you think of the video?
What's your fave fall drink?

12.29.2015

DIY Mask For Exhausted, Stressed Skin

This shop has been compensated by Collective Bias, Inc. and its advertiser. All opinions are mine alone. #SamsClubMag #CollectiveBias


Was it just me or did the holidays FLY by this year? The whirlwind of wrapping paper and family coming in and out has left me exhausted. And when that happens, I get sick. It happens every year.

So to combat that, I did two things: the first was to head to Sam's Club and get stocked up on supplies.


Sam's Club is the health and wellness destination for everything you need, whether it's free health screenings, otc meds (I like stocking up on my vitamin C), or the Pharmacy. You've got the convenience of shopping while your prescription is being filled. For more info on Sam's Club pharmacy, click here.

And the second thing I did was make my favorite DIY facial mask. If you've got stressed skin, if you're exhausted, do yourself a favor and make this. And if you're staying up late for New Year's Eve, you'll definitely want this the next morning. Trust me. PLUS, it's a great way to use up those leftover ingredients from the holidays. Here's how to make it:


You'll Need--

  • 1/4 c plain Greek yogurt
  • 1/2 c pumpkin puree
  • 1/2 tsp raw honey
  • sealable container (I used a glass bowl)
  • spoon
Look at that drizzling honey!

I got all of the ingredients I needed at Sam's Club. Speaking of that, they have an online Healthy Living Made Simple Magazine. One of the articles that stuck out to me was on the benefits of pumpkin. Pumpkins are full of good things, like vitamins A, C, and zinc. Pumpkins are wonderful for skin that is inflamed.

To make this mask, all you have to do is pour the ingredients into the bowl and mix them well. 


Apply it to your skin and leave for around 20 minutes. Rinse away and pat dry. This is what it looks like after 20 minutes on the face. It feels so cooling and relaxing.


So what else makes this mask a must-make?
The Greek yogurt soothes, hydrates, and gently exfoliates skin, thanks to the lactic acid. The honey works well on inflamed skin. The honey is antibacterial, an antiseptic, and provides moisture.

I love keeping this in the fridge for up to a week. It feels amazing when it is chilled. You can also freeze it for up to 3 months, or just freeze the pumpkin for up to a year, so you can make it anytime.

Still not sold on this mask? I urge you to try this mask on just half of your skin. You'll be able to tell a difference! Here's to a happy and healthy new year!

Would you try this mask?


12.01.2015

November Beauty Faves & Chit Chat

Spot the E?

Happy December! Did I just type that? *checks calendar* Yes, another month has flown by, so let's do a recap for November. How was your November?

First, how cute is my mug? My youngest sis bought it for me for my birthday--see the pumpkin and the E? I thought it was appropriate to end the month and the season with.


Can't view at work? Subscribe HERE so you can watch anytime!

In case you've never watched one of my Chit Chat videos, I review the month's highs and lows and share my beauty faves.

It's only 4 minutes, plus Charlie is at the end, hehe.

November was a bittersweet month for me. I share more in the video including my Thanksgiving and more.


So yes, the month was very hard, but I'm glad I made it. Something that definitely cheered me up this month is this Box of Sunshine--see how nearly everything is yellow? A huge thanks to LaNae for sending that! Isn't that sweet?

And now for some beauty faves--I kept it short this month, but would really like to include more faves--let me know what you think:

November Beauty Faves:

  • Bobbi Brown Vitamin Enriched Face Base--excellent for dry skin
  • Ofra Liquid Lipstick in Laguna Beach--Very matte lip color that lasts all dang day
  • MAC Please Me--Gorgeous matte nude and look at that shiny purple tube?
  • No. & Lift & Luminate Foundation--Use with a dampened beauty blender for glowing skin.
  • Rimmel 107--Who doesn't love this berry color? Since I'll be wearing red a lot in December, I wanted a change for the month.
  • QTica Extending Top Coat--I got this at Bed, Bath, & Beyond. It works SO well. Love it.
How was your November?

11.25.2015

3 Cranberry Beauty DIY Tricks

orig

With Thanksgiving tomorrow (I'm celebrating with family but will be back here Friday) I thought I would share 3 of my favorite cranberry beauty DIY tricks

Cranberry is a natural preservative and an excellent exfoliant for skin. So before you make your Aunt Bea's famous cranberry sauce, save a few of them for these super fast (I know y'all are busy!) DIY ideas. You're going to love them. Tell me your faves!

Get ready for your skin glow and feel refreshed.

  • This cold scrub will wake you up and your skin, too. Perfect for when you're up early.


  • Save this for after you've survived Thanksgiving and Black Friday.  All you need is 15 minutes.


  • 2 ingredients and perfect for acne-prone skin.

Which one of these interested you the most?


Extra Elle:
  • Are you preparing the Thanksgiving for your family? I'll be bringing my most-requested dishes of Ice and Napkins. Oh yeah.
  • Heading back home for the holiday, so safe travels all around, whether your trip is to the table or hours away!
  • Happy Thanksgiving!

11.23.2015

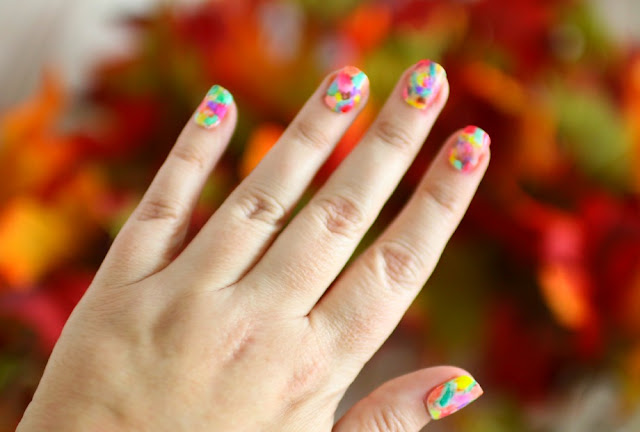
Autumn Watercolor Nails: How To


how to autumn water color nails


It's still fall y'all (as evidenced by this post), and I thought I'd wrap up the unofficial ending of the season with a quick and effortless nail tutorial.

The best part? I bet you have everything you need already!

markers for nail art tutorial
First, paint nails white. This makes the colors pop. I suggest 1 light coat.

Next, grab some permanent markers--whatever colors you'd like. I was going for an autumnal vibe here, influenced by the leaves and the colors of season.

Third, you'll need a small container of rubbing alcohol.

Finally, a clear polish to seal the design.

nail art hacks sharpies
Once the white coat has dried, dip the tip of the Sharpie into the alcohol and then make your design (I did blobs and dots) onto the nail. Repeat with additional colors. Make sure all of the nail is filled in. Depending on the dryness of your marker (like if it's new or old), you might have to leave the marker in the alcohol for up to 5 seconds.


watercolor nails for fall

You can also dip a small brush into the alcohol and blur out your colors that way. If you get too much alcohol on your nail, just lightly blow it to dry. Sharpies are non-toxic, but I suggest sealing your work with a clear top coat.


autumn fall watercolor nails
And that's it! This would make a fun idea for a Thanksgiving accent nail, too. 

What's on your nails?


Extra Elle:
  • Had a super quick weekend back in my hometown. My nephew turned 7 (I shared it on Insta and Snapchat--both Ellesees). I'll be back there for Thanksgiving this week.
  • My good weekend was almost ruined by a rude comment on a pic of mine. I had a response, even a blog post planned out. But decided in the end to let it roll off my back--she doesn't know me and responding to her wouldn't fix anything. I felt instantly better.

11.28.2014

November Ipsy Plus Coffee & Chit Chat


Well, happy post-Thanksgiving y'all. How was yours? I had a big ole post planned for yesterday, but I have not felt well at all. I'm currently wrapped up on my Mama's couch as I type this. Anyway, before I came down with this nasty cold, I filmed this month's chit chat. I love making these--it's been almost a year since my first one--as it's a way for me to chat with y'all, as well as a document of that month in my life. Please check out the video below:


11.22.2014

How To: Thanksgiving Makeup (All Drugstore)

orig

Happy weekend! What! I'm mixing it up and doing a post on a Saturday! It's an annual tradition for me to do a look for Thanksgiving. It's my Mama's favorite holiday, so I always want to look nice. I mix it up the looks every year, and I decided to use only drugstore makeup for this version. And there's a video to show you how.

Can't see? Try here: http://youtu.be/ngYeg6H-kHQ 


In the video, I did my foundation first (because c'mon, who needs to see me without foundation for majority of the video?) but normally I do my eyes first. Here's what I used:

  • L'Oreal Pore Vanisher (see review here). For pics, I use the Miracle Blur to give me that airbrushed look and hide any imperfections.
  • L'Oreal True Match (best for dry skin and applied with beautyblender...watch video for a demo)
  • Sonia Kashuk concealer palette
Onto the eyes--my fave part! I used two palettes here, but really both aren't needed.
  • Maybelline Designer Chocolates
  • Wet N Wild Knock on Wood
  • Sonia Kashuk pen liner
  • ELF eyelid primer
  • Maybelline Brow Drama (review here)
  • Covergirl Flamed Out mascara (tutorial here)
I've got a closeup so you can see the shades a little better.
  • I applied the ELF primer--see more reviews on primers here--because I have veins on my lids and since I'm doing this purple-mauve-cranberry color, I don't want to enhance them.
  • Using a flat shader brush, I applied that shimmery mauve color on my lids.
  • In the crease, using a crease brush, I applied the brown. I blended it out using a fluffy brush.
  • Using the brown from the WNW palette, I applied it in the outer corner with a crease brush and blended it with the fluffy. 
  • I smudged that dark brown under my lower lashes using a pencil brush.
  • Next was eyeliner on my upper lash line and mascara.
Here are the brushes I used:
  • Sigma E40
  • Sigma E35
  • Sigma E60
  • Sigma E30
  • BeautyBlender

Here are the eyes (before the liner and mascara)--it's a still from the video, so the quality isn't the best, but it was the only pic that turned out! #bloggerprobs

I sometimes use powder and sometimes I don't, since I have dry skin. I used ELF HD powder and then applied Maybelline Master Glaze Blush in Mauve. Dry skin will love this since it gives such a natural flush. For lips, I used Kate Moss for Rimmel lipstick in 107. It's a matte color between red and berry--that's the best way to describe it. This is my second tube of it. Oh, and if you like red lipsticks, I've got a post coming soon on my fave ones.

And here's the final look! If you celebrate Thanksgiving, tell me your plans!

PS: Thanks everyone for your comments on this post! I was really surprised at the support and glad y'all laughed at me as much as I did!

Giveaways Galore (thank you for entering):

11.18.2014

DIY: Frosted Cranberry Scrub

Stop! First up--before you skip to the comments, let me remind you of 3 current giveaways I have going on that are easy-peasy to enter (just click the links):

  1. $25 Walmart giftcard (thanks Covergirl)
  2. Bare Minerals Holiday Brush set
  3. $100 Visa giftcard (thanks Mary Kay)
And now back to the post:


In theory, the holidays are supposed to be a joyous, thankful, and holy time, but unfortunately it's not the case all of the time. Thanksgiving dinner has to be cooked (I am in charge of making ice! ha!), presents have to be wrapped for Christmas, and there's family to deal with. Ah, yes, a joyous time like I was saying. But seriously, all of that stress isn't a help for your skin. Today I've got a scrub that will give softer, glowing skin and takes a minute to make. Cranberries are a Thanksgiving staple, so take a few from the bag and make this gentle scrub.

You will need:
  • handful of frozen cranberries (I used organic)
  • handful of plain oatmeal, uncooked
  • 1/2 tsp sweet almond oil (or fave facial oil of your choosing)
  • blender and spoon
You will:
  • Place everything in the blender (I use a clean coffee grinder since this is such a small amount) and blend until a thick paste consistency. You might need to add more/less oatmeal.
  • Rub the scrub onto your face in circular motions for around a minute. Since the cranberries are frozen, this feels so cooling and wonderful.
  • Carefully rinse away and follow with your favorite moisturizer.

FYI:
  • Cranberries help give that glowing skin, the oil moisturizes, and the oatmeal is a gentle scrub.
  • Feel free to skip the oil if you'd like or replace it with honey.
  • If you don't have sensitive skin, I suggest cornmeal--this is what I usually choose (I know this isn't a staple in everyone's pantry, so oatmeal works). Sugar works well too, but I like that better on the body.
  • This is enough for a single serving, but feel free to make more and keep for up to a week or two in the fridge.
  • Avoid the eye area and avoid if allergic.
  • More ideas:

PS: To thank you for reading my blog, I've got 3 giveaways! Hurry and enter!

  1. $25 Walmart giftcard (thanks Covergirl)
  2. Bare Minerals Holiday Brush set
  3. $100 Visa giftcard (thanks Mary Kay)

9.23.2014

10 Fall DIYs

pic source


Hey you! Happy autumn! It's no secret that fall is my favorite season. It really makes me want to get in the kitchen and start making stuff--beauty DIYs that is. I'm sharing a roundup of past recipes that you might have missed. As always these are quick and easy to make. Just click the title of what you'd like to see!

11.24.2013

Beauty DIY: Cranberry Masque for Glowing Skin

So Thanksgiving is this week, and that can cause a lot of stress, whether you're cooking the big meal, hosting the dinner, or dealing with family. That stress can definitely show on your skin. Today I've got a quick masque that you can use before (and after) the guests arrive. This masque moisturizes and gives you glowing skin. I bet you already have the ingredients on hand, so carve out 15 minutes, get ready to relax, and let's make this masque!


N e e d:
  • 1/2 c washed, whole cranberries (I used organic)
  • 1 tbsp plain yogurt
  • 1 tbsp honey
  • blender, small bowl, small spatula

D o:
  • Blend the cranberries, yogurt, and honey into a blender. It should blended to a pulp, just like in the first pic. It doesn't look appealing, but it works!
  • Pour into a small bowl. Apply to face and leave for 10 minutes. Wash away masque.
  • Keeps in fridge up to a week. 
T r y:
  • The cranberries give you that glowing skin, the honey moisturizes, and the yogurt moisturizes, helps prevent breakouts, and brightens skin.
  • If your skin is really oily, switch out the yogurt for clay. You can buy powdered clay from a health food store, or Queen Helen Mud Masque Pack. If using powdered, add 1/2 tbp. of filtered water or 100% pure cranberry juice.
  • Be sure to use yogurt that is Greek or not fat-free.
  • Try using a small hair highlighting brush, from the beauty supply store, to apply the masque.
  • This masque is edible, a little tart, but edible!
Here's another recipe to try with cranberries:

PS: More links you might have missed:
--$50 Giftcard--ends 12-18
--I finally joined the rest of the world and started a Facebook for the blog. Add me if you like.

11.21.2013

Smoked Cranberry: Thanksgiving Makeup, Hair, & Outfit (Video!)


I celebrate Thanksgiving with my immediate family and then with my Grandmother's family. One is more casual and the other is a little more formal. I like having hair and makeup that will work for both, so that way I can change my outfit and go. Today I'm sharing a tutorial, using mostly drugstore products, that is really fast and easy for a casual look. I did my hair and makeup for this video in under 15 minutes! My eye makeup might be a little dark for you, hence the "smoked cranberries" but I wanted to make sure it showed on camera (lights wash me out) and I was doing this without a mirror. These are only suggestions--do and use what you'd like. What is your Thanksgiving like? Is it formal? Casual? Enjoy the video below.


Can't view the video? Click here.

(still from video)


Makeup (watch video for tutorial):
  • Maybelline Color Tattoo: Pomegranate Punk
  • The Balm Nude 'Tude Palette
    • Seductive, Sultry, Sexy, Sassy, Sleek
    • I chose this cranberry-plum shade since it would be complementary to most skin tones. Red cranberry is hard to wear. If you can't find this palette, try a similar color from a Maybelline Eye Studio quad (like Mad for Mauve) or a cranberry-plum blush.
  • Em Cosmetics Liner: Brown
  • L'Oreal Butterfly Mascara
  • Maybelline Dream Bouncy Blush: Plum Wine
  • Revlon Matte Balm: Elusive
  • Revlon Parfumerie Polish: Bordeaux 
(still from video)

Hair (watch video for tutorial):
  • Divide hair into 2 sections.
  • Twist away from face.
  • Run flat iron over twists. I used one with wide plates.
  • Shake loose waves.
(blurry still from video)

Outfit:
  • Plaid flannel shirt--Old Navy
  • Cranberry sweater, jeggings, booties--American Eagle
(awkward still from video)

thanksgiving casual outfit


What are you wearing this Thanksgiving? (Or today?)

PS: More links you might have missed:
--$50 Giftcard--ends 12-18
--I finally joined the rest of the world and started a Facebook for the blog. Add me if you like.

11.11.2013

Beauty DIY: Pumpkin Cheesecake Masque


Hey you! So Halloween just ended, and Thanksgiving is around the corner. What to do with all of that extra pumpkin? You don't want to eat it and have more calories, but you don't want to throw it out either. Instead, make it into a masque for your face! Yes! This easy masque is great for skin and takes moments to whip up. It makes a cute gift, too. Check out how I made it:


N e e d:
1/2 c cream cheese
1/2 c pumpkin puree (fresh is preferred, but canned is fine)
Optional:
4 Tbsp light brown sugar
dash of nutmeg


D o:
  • Mix cream cheese and pumpkin together.
  • Apply to face and let set for 20 minutes.
  • Wash away with warm water. 

T r y:
  • For presentation purposes, I made this look like a tiny pumpkin cheesecake, with my "crust" being the brown sugar and then spooning in the mixture. I added a little cream cheese on top and then dusted with nutmeg for more of an authentic pumpkin cheesecake smell. But when I do this at home, I use a small bowl.
  • The brown sugar (I recommend light) can be used first as an exfoliant and then the masque can be used. You can also mix in the brown sugar.
  • Since this is a gloopy mix, I like painting on the masque with a tint brush (used for applying dye to hair and can be purchased at beauty supply stores for less than a dollar) and sometimes then using a plain sheet mask on top to keep it from getting everywhere!
  • Pumpkins are a great source of vitamins A, C, and zinc. Those with acne or oily skin benefit the most. 
  • The cream cheese is an excellent moisturizer.
  • The nutmeg smooths skin and treats it. It also gives this recipe that pumpkin "pie" smell. 
  • The brown sugar is an exfoliant.
  • I do not use cinnamon, as it can burn and exacerbate skin.
  • Pumpkin cream cheese exists, but I prefer making it myself, so I know exactly what goes into my masque.
  • This masque can be made/used cold or warm. 
  • This keeps for about a week in the fridge.
Looks good enough to eat! But it goes on your face instead!

MORE AUTUMN BEAUTY DIY RECIPES:

Disclaimer:

All products mentioned are purchased by me unless stated.
All pics, thoughts, etc, are mine unless otherwise noted. Publishing or redistributing any content from this blog is strictly prohibited. Please seek permission first. Thank you.


Related Posts Plugin for WordPress, Blogger...