Showing posts with label beginner makeup. Show all posts

1.30.2017

Best No Makeup-Makeup Brands

organic makeup brands


"I don't really wear a lot of makeup.
I'm looking for more of a no makeup-makeup look, like a natural look. 
What do you suggest?"

--via Facebook message

I get asked this so often I thought it might help some of y'all out there! While I can definitely find you beauty products from here and there to complete your request, I thought it would be easier to share some of my favorite no makeup-makeup brands. These give you a natural look, are great for beginners and those who don't want to wear a lot of makeup. Plus, I think many of you will fall for what a lot of these brands stand for.


I lovingly call this my Model's Day Off brand. This brand features skincare, which I love for glowy skin, but they feature makeup as well. You can grab the basics, like their perfecting skin tint, boy brow, and generation g lip product. See my Glossier review and video here.


What drew me to this brand was the genius idea of everything being in stick form--how easy is that? Makeup crayons for your eyes, lips, and face...and it was started by two sisters and their mom! You can easily find shades that will work for you that look natural. My faves: lip+cheek pencil, magnetic eye color, and their concealer pencil. Find them at Sephora and read one of my many mentions of Nudestix here.

via ellesees Instagram


I love Ilia because each product is filled with up to 85% bioactive organic ingredients. They want to create the purest products possible. Even the containers are made from recycled aluminum. And their line is lovely. I want pretty much everything. Above is what I've tried from them. Find them here and get your list ready.


I had heard of this brand for years, but mostly for hair care. Then I started getting packages from them with skincare that I loved. But their makeup line is what really got my interest. I had no idea they did makeup! While there are pigmented products for a more dramatic look, they offer plenty of no makeup-makeup options.


Wearing Aveda shadows, eyeliner, lip liner, lipstick, and gloss as seen in the pic prior to this one

More Suggestions:

Paula's Choice--Another skincare brand that features makeup

It Cosmetics--They have some very natural-looking products. Their CC Cream works on just about anyone.

Neutrogena--Grab a lip crayon, eye shadow stick and foundation to keep it looking natural.

Almay--Whenever I get asked for a really natural-looking mascara, this is at the top of the list.

Mineral Fusion--Find this brand online and at Whole Foods

100% Pure--A great organic beauty brand

Burt's Bees--Another skincare brand but this one has really stepped up the lip products! Here's a new favorite of mine from Burt's Bees.

Do you like the no makeup-makeup look?
Which brands would you try/like?

5.12.2016

Non-Touring: Try the Trend Tutorial

Have you ever seen a beauty trend on a celeb (or on Instagram) and wondered if it would REALLY look like that if you tried it? That's what I'm doing today with my new series TRY THE TREND. Whatever the latest beauty trend is, I'll try it here to see if it's practical and if I can get similar results.

If you have been into makeup long enough, you'll realize that nothing is really new. Old techniques are refreshed, stand by looks are given new names, and I think that's the case with today's trend. By the way, not into trends? Remember this is all in good fun. Don't knock it 'til ya try it, right?

Up first is a new trend I read about on Marie Claire.com called Non-touring. And it's supposed to be the hottest trend this summer.


What is "Non-Touring?"
  • Think light coverage and glowy skin
  • No contour, no heavy full-coverage foundation
  • Perfectly illuminated skin that shows off your features
  • Not strobing, as strobing involves a heavier highlight and more full-coverage makeup. Make strobing lite is a better way to think of it?
  • 3 steps
Glowing skin that doesn't look overdone, just natural

Non-Touring Tutorial:
  1. Use a primer that's hydrating, not mattiyfing. I personally say skip this step.
  2. Apply a tinted moisturizer or BB cream or CC cream. You don't want full coverage. Keep it light. Apply concealer to spots if needed.
  3. Apply highlight to the high points of the face, like above the apples of cheeks, chin, forehead, cupid's bow, the bridge of the nose, etc. There is no contour. Choose a highlighter that works for your skin tone. I used champagne.
Below are high end and drugstore alternatives to try this trend:
High end products to try: Too Faced Rx primer, IT Cosmetics CC Cream, The Balm Mary Lou Manizer

Drugstore options: Milani Prime Perfection, Garnier BB Cream--I use the original for my dry skin, Maybelline Highlight/Contour kit

Want to see a quick demo of the technique? Check it out below:


Would you try "non-touring?" 
What trend would you like to see me try next?

Extra Elle:
  • Speaking of higlighting products (my fave) last week I got the Pat McGrath highlighting kit. I'm not doing a review on it since it's so pricey, but it is SO good. I shared a preview on Snapchat.
  • Finally went to the Dr. so I am slowly feeling better. I apologize for my pics today--I look awful, so please excuse my swollen sinus infection face.

3.15.2016

Make Cheap Eyeshadows Look Expensive


Have you ever purchased an eye shadow only to be disappointed? Waste of money, right? I've found my disappointments to come mostly from drugstore shadows, but I've had my share of duds in the pricey department as well.

Recently I did a huge review of new drugstore eye shadow palettes, and I discussed how I had to make them work, due to their quality. Cheaper shadows can sometimes be chalky and not as pigmented. You can barely see them on the lid! Luckily, I'm sharing some of my go-to methods to help. Here are 4 ways to make eye shadows pop:


1--Flat Shader Brush:
  • As I've said before in my Beginner Eyeshadow Under $5 Tutorial, you don't need an expensive brush for this. Use one that is flat, similar to the one pictured. ELF works. Pat on the shadow. If you brush it on, you won't get as much pigmentation. You'll get fall out--you know where you end up with shadow on your lashes and face.
2--Pat Finger
  • Just like the method above, but use a clean finger to pat on the shadow.


3--White Primer
  • Many of us use a primer already for lids, and depending on the primer, sometimes those only help shadows stay put. 
  • Try a white primer--I really like them on dark skin too. They are a must if you are going for super bright colors. The same concept exists for mascara primers--they are usually white too!
  • Then pat your shadows on top using a brush or clean finger. Here, I used the NYX Jumbo Eye Pencil in Milk. You can get it online, ULTA, CVS, and sometimes Target. They have it in a pot version as well. Maybelline Color Tattoos has a white pot version.
4--Wet Brush
  • I mentioned this technique on my new drugstore eye shadow palettes post, and many of you asked for clarification. Take distilled water and spray a small amount on the brush. I used MAC Fix + here, but I've used makeup setting sprays in a pinch. You can keep distilled water in a small spray bottle for this purpose. If your brush is dripping, it's too wet. Then dip the brush into the shadow. If the shadow now has a pool of water in it, your brush is too wet. Pat the brush onto the lid. Your shimmer shadow will be intensified and metallic.


On your left I used the wet brush with a cheap gold shimmer shadow--see how more intense it is when next to the gold shadow that I patted on?

On your left, I brushed on a shimmery champagne shadow using a regular fluffy brush. You can't really see it! On the right, I used the flat shader brush to pat it on. The flash shows it better but it is definitely more noticeable in person.

Remember, I gave you 4 options, not 4 steps. Just pick the one that works for you.

And here's the final look with the drugstore shadows.

What's your favorite eye shadow palette?

Extra Elle:

1.07.2016

L'Oreal Lumi Cushion & Maybelline Dream Velvet Foundation Reviews

I am so excited y'all are wanting more reviews! Today's two reviews come from my recent haul (it's right here, PLUS a video). These two new drugstore foundations recently hit the shelves and I couldn't wait to try them.

L'Oreal True Match Lumi Cushion Buildable Luminous Foundation
  • $16.99
  • 12 shades
  • "first liquid cushion foundation"
  • available: drugstores and mass retailers, ulta

Cushion compacts are not a new technology--I've seen them in Asian beauty for years, but most of them are mineral makeup based.

This one is similar in that it opens with a sponge and then you lift the lid to reveal a saturated sponge.

It differs from its other compact counterparts in that the foundation is a thin liquid.


On your left, you will see the Lumi Cushion applied to half of my face.

You can tell the coverage is barely there.
However, the coverage is buildable, as you can see with the completed foundation on your right.

On the right pic, I am wearing concealer.

  • To apply this, I love using a brush. The puff sponge works but takes too long for me. Beauty blenders work well too, but I wasn't able to get as much coverage with them.
  • light-medium coverage
  • wear time on me was around 4 hours, with no powder
  • fresh, luminous finish
  • Best for dry and combo skin. I have dry skin, but I think this might break down on oily unless mattifying primers were used (fyi primer reviews coming soon).
  • Overall: If you want a light, natural-looking makeup, try this. I liked this because it gives me liquid foundation in an easy-to-apply way. Just dip and apply. I dislike the price.
Maybelline Dream Velvet Soft-Matte Hydrating Foundation (Plus applicator, sold separately)
  • $10.99
  • available: drugstores, mass retailers, ulta
  • 12 shades
  • "A refreshing gel-whipped foundation that leaves complexion perfected and smooth with a velvety, soft-matte finish while skin stays hydrated for 12 hours."
  • Gel-whipped formula--it looks like a mousse

Just as before, on your left, you'll see the foundation applied to half on my face.

The coverage is instantly medium.
  • To apply this, I like using a sponge best. Brushes can leave marks due to the foundation's consistency.
  • Speaking of sponges, I also purchased the Dream Blender Foundation Blending Sponge for around $5.99. I hated this sponge. It it was too small and I couldn't get the sponge saturated to expand. There is also a different version of this sponge-on-a-stick at Bed, Bath, and Beyond from a different brand (please watch my video here to learn more about it).
  • medium coverage
  • wear time is around 6 hours, with no primer or powder
  • soft-matte finish that is hydrating and not drying
  • Best for combo skin, but oily skin should give this a try.
  • This product really soaks in, so I didn't like it on my dry skin as the day wore on, but it looks great in pictures.
  • There is dimethicone in this, which can break you out. I did get one tiny zit from one of the times I wore this.
  • Overall: This is a nice matte foundation that isn't too drying and gives nice coverage. Combo skin might like this.
Which one of these would you try?

Extra Elle:
  • I highly recommend the you-bake cinnamon rolls from Trader Joes!
  • I started getting messages from several of you wanting to know why I unfollowed on Instagram. I DID NOT. I had a couple of Instagram apps, like one for tags, and there was a new game on my phone, so I deleted them. PLEASE let me know so I can fix this! Sorry about that.

10.23.2015

How to Hide a Tattoo

how to hide tattoo makeup


I've got a secret!

Did you know I have a tattoo?

I do! A few of you eagle-eyed viewers have noticed it in videos over the years. 

I keep this huge list (currently 316) of Blog Ideas To Do and an updated tat hiding tutorial as well as a tutorial for airbrush makeup have been on there for years. I don't talk about my freelance career on here, but I've done airbrush makeup for several years and own a few different systems. The result is amazing in pictures and it lasts all day.

Using an airbrush machine sounds intimidating and time-consuming. I assure you neither are true, and the results are worth it.

luminess airbrush makeup review


The system I'll be using for the tutorial is Luminess Air. They were kind enough to send me a system and kit of products. Normally we associate airbrush as being perfect for oily skin, since this is mineral-based, but I wear it on my dry skin easily (they have different foundation types). It's cruelty-free as well.

luminess airbrush makeup
Like I said before, I own a few systems, have tried at least 5, and this is literally the EASIEST system I have ever used. Even if you aren't a makeup pro, you will be able to do this. They have products for all skin types/tones, and the system itself comes in different colors, in case you aren't a pink and black fan. You can get one at LuminessAir.com and use my 20% discount code 327460109. I don't make any money from that code, just sharing a product I love.

how to use airbrush machine
Why hide a tattoo? Be proud! Forget society's rules! I understand where you're coming from, but hear me out on this:

Years ago I was asked by via email by a reader who wanted to hide her tattoo with makeup. She had her ex-husband's initials tattooed on her chest. She told me the story of how this man abused her for years. They had children together and she was scared to leave him. She finally did, and didn't want her kids to grow up in that environment any longer. Seeing that tattoo represented the power he held over her. She wanted that tattoo erased, and she couldn't afford laser, so makeup would do. I never heard from her again after those emails, but if she's reading this, I hope she knows I think of her often.

So I don't think of this truly as hiding, but as a blank canvas. A new start. We have the right to change our minds, after all.

Now onto the tutorial:

For the purpose of this tutorial, I would suggest shaving the tattooed area, if possible. I was rushing here, and you can see the makeup on my arm hair. Turn on your machine and add a few drops of shaken foundation that matches the skin tone of the area. The Silk foundation is for dry skin (me). They have satin and matte formulas as well.

how to airbrush
Holding the stylus like a pen around 8 inches away from the tattoo, gently pull back on the trigger. Keep the stylus moving in small circular motions, never letting go of the trigger.

how to airbrush
Within a minute, the tattoo will be hidden. Just like if you were using spraypaint, make sure to use a light touch and not spray too close. You will have to add more drops depending on the size and color.

before after hide tattoo makeup
Here's the before and after. I love airbrush makeup because it gives such a flawless finish. My tattoo and freckles are gone. If you have redness, uneven skin tone, bruises, scars, etc you will love airbrush makeup. I have a friend with a large birthmark on her face that she was always self-conscious of, and it still makes me tear up thinking of her joy the first time she had airbrush makeup done. The power of makeup, y'all.

I know sometimes seeing a video is easier, so I made a quick one for you, below. You can watch the tattoo disappear before your eyes.


before after airbrush makeup
Also at the end of the video, I show a quick tutorial of airbrush makeup. 
Here's the before and after of that. Y'all, my skin is GLOWING in that video.

By the way--The airbrush makeup doesn't get everywhere. That's why I'm wearing a black shirt and big earrings in the video, to show that is light and airy!

Again, if you're interested, be sure to stop by LuminessAir.com and use my promo code 327460109.

Do you have any tattoos?

Extra Elle:
  • Tomorrow I'm interviewing the lead makeup artist for Milani Cosmetics. Any questions you'd like asked? Follow me on Snapchat to see my behind-the-scenes! @ellesees
  • Thanks to those of you who did my link up yesterday! The next one will be November 24.

9.15.2015

My Everyday Makeup Routine


In case you missed this post, I asked for blog feedback, and a couple of you wanted more makeup tutorials--you got it! This is my everyday makeup routine.  I shared this as a guest post last month, but thought you would like seeing it. This is great for daytime looks, natural looking-makeup, and beginners. Plus, I've got something for all budgets.


First, I prime and prep my skin with the Smashbox Pore Minimizer Primer. I like this one because it helps hide pores. Next I apply foundation--my skin is on the drier side--so I love the glow this Giorgio Armani Silk Foundation gives me. Then it's time for concealing my dark circles, and I suggest Bobbi Brown. It's a great corrector and comes in many shades.

Drugstore Options: 

  • NYX Pore Filler
  • Covergirl Stay Luminous Foundation
  • Wet N Wild Fergie Come Correct Concealer


For an everyday look, I keep the eye shadow to a minimum. I love this Too Faced Natural Matte Palette because it offers so many looks. I pat the lightest shade (Silk Teddy) on the lid. Then, I sweep some of the shade Strapless into the crease and blend. I smudge a little of the shade Risque under the lower lash line.

Drugstore Options:

  • Sonia Kashuk Eye on Neutral Matte Palette (this one is pricey for drugstore, but I don't own many drugstore matte palettes I like. I would also suggest L'Oreal Nude Palettes)


I then curl lashes, add a Lancome mascara and a Sonia Kashuk liner to my upper lashes. My brows are naturally full so I use Loreal Stylist Brow Plumper to put them in place. I add a little Becca highlighter, a sweep of MAC peach blush, and a peachy gloss from Japonesque.

Drugstore Options:

  • L'Oreal Miss Manga mascara
  • Jordana liner (Sonia Kashuk is at Target and still considered drugstore)
  • Wet N Wild Reserve Your Cabana Highlighter
  • Jordana Blush Peach Blossom
  • NYG Gloss in Napoleon

And if you want to see this effortless look in action from start to finish, then check out my video below:


What's your everyday makeup routine?

Extra Elle:
  • This is my third year of getting invited to NYFW and not going. I like watching the streams of them online instead. Maybe next year! #introvertsuniteseparately
  • After seeing it everyone's blog, I decided to get The Royal We, after Kate said it was $3.99 on Kindle. It was a quick, lovely read!
  • Charlie and I had an al fresco dinner at an Italian restaurant near my house yesterday. He is a "people person", er, dog, and I'm very quiet. I swear he gets recognized everywhere we go.

9.14.2015

Beauty Quick Tip: Get Thicker, Fuller Lashes


Hey you! I hope you had a great weekend. But first, I wanted to thank you for your feedback on Friday's post. I appreciate your advice so much. Today's Quick Tip is how to get thicker, fuller lashes. No fancy lash growth serums or false lashes required! Just an easy technique I bet you're already doing. 


before/after 


Here's what you'll need:


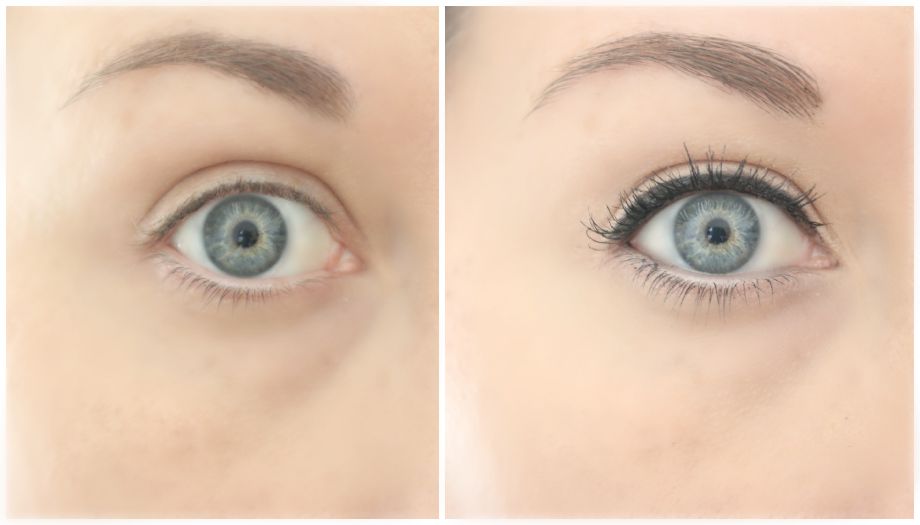
1--If you're wearing shadow, do that step first. I skipped it here. Next, curl your lashes and apply a volumizing mascara. This is the first trick to making lashes look thicker. I like L'Oreal Voluminous or Dior Show. See the mascara wand (aka spooley) in the pic above? This type of traditional brush gives volume. Wiggle it at the base of the lashes before moving it up.


2--Choose the liner for your upper lash line. Despite the name, the purpose of eye liner isn't to line eyes, it's to make lashes look thicker. Choose from pencil (pictured from last month's IPSY bag), gel (in the collage above), liquid (usually has a felt tip, like you'd use for winged liner), or powder. The trick here is to make sure there is NO skin gap between your liner and the lash line. You wouldn't believe what a common mistake this is!

3--If you're using powder, pencil, or gel, use a clean brow brush (pictured in collage, all price ranges) to really work that product into the lash line to help prevent gaps and get thicker-looking lashes. Wiggle it back and forth to work it in.

4--Here's the biggest trick to get thicker lashes--line the waterline. Not lining this area allows the skin under the lash line to show through and disrupts the illusion of fuller lashes. I admit, using a pencil always makes my eyes water, but when I use a brow brush with product instead, it works. Just gently lift up the upper lashes and press product onto the waterline. Yes, this is safe for contact lens wearers and it doesn't hurt. If the brow brush is too big for you, try a traditional liner brush--it will say it's a liner brush on the packaging. It's smaller and pointed, so it will take longer, but it works just as well.

And that's it! From here you can smudge a shadow underneath the lower lash line (I skipped it here). It looks less harsh than a liner underneath the bottom lash line. If you get transfer of liner from the upper waterline to to lower, you can leave it or you can gently remove. Remember to make sure there are no gaps around your lash line and you're set!

What's your favorite liner? Mascara?


Extra Elle:
  • How was your weekend? I have a cold so mine was spent at Sofa City. ;)  I am feeling a little better and glad I had the weekend off to relax!
  • DON'T FORGET my link up on the 22nd--next Tuesday. Here's more info.

7.10.2015

Strobing 101: How To, What Products To Use, Tutorial

One of the biggest beauty trends right now is strobing. Yes, this is officially a "thing." But what is it? How do you do it? What products do you need?

I'm answering all of those questions today and I am including a tutorial. BONUS: I am sharing my highlighter collection, if you'd like to see--it's at the end of the post.

strobing tutorial


What is strobing? 
Strobing is simply enhancing your features using a product that has a sheen and/or shimmer to it, and chances are, you are already doing this. The goal here is a glow on your skin in those enhanced areas.

How is this different from contour and highlight?
With contouring, you are hiding/recessing features to create an illusion, like having a smaller chin or deep cheekbones. Highlighting can be done with a matte powder (think Kim Kardashian's famous banana powder highlight) or a shimmer one.

Why do I need to try this?
If you could never get the contour/highlight look to work for you, strobing is a great trend to try. Summer is the perfect time--think beachy waves and sun-kissed skin.


What products do I need for strobing? How long does this take?
You need a highlighter with sheen to it. Highlighters/illuminators/luminizers come in many different forms and shades. For all skin types, try powder. For drugstore, try NYX and Physician's Formula. Becca and The Balm's Mary Lou-Manizer are my fave high-end ones. For dry skin, maybe a cream or liquid, like the Sonia Kashuk one pictured above, or the new L'oreal Lumi Glow Illuminator. If you are using powder, you'll need a small brush. Some people like a fan brush, but I don't think it is necessary. I like Real Techniques Setting Brush. but used one from Stillazzi for the pics.  You can use your fingers to blend with the liquid and creams. For more suggestions, check out the video. I give around 30 options for all price points/colors.

It takes a few seconds to a minute or so, depending on how/where you apply.

How do you do it? Strobing Tutorial?


Here's a gif version using powder and a brush, but the same techniques apply for any type of highlighter. Full disclosure--I am sharing a general strobing method. Since we all have different face shapes and features, my suggestions might not apply to yours. Pick the areas that you want to enhance.

  • Start by applying a powder to the center of the forehead and blending out. If you have a large forehead, you can skip this.
  • Apply the highlighter in a "C" shape, as pictured. You are enhancing/bringing out features, so think where the sun hits your face. Think slightly above the brows, near the eye, and focusing on the tops of cheekbones. Be sure to blend.

Other areas of application:

Apply to the highest point in the middle of the nose. Apply down the length of the nose to elongate it. Or apply at the end to lift it up.
Apply above the lips on the Cupid's Bow.


Apply on the chin.
To really glow, apply some under brows and in the inner corners of the eyes. You will need an eyeshadow brush or Q-Tip for those areas.

And now for my highlighter collection video--this was requested, so thank you. Check it out below or on my Youtube channel.

http://youtu.be/BfnTOrCBLIA

Are you into the strobing trend? Would you try strobing?

Extra Elle:
  • Thanks for the tv show suggestions! I can't wait to check them out this weekend.
  • Weekend plans? There are a few movies I want to see as well as have some pool time.

Disclaimer:

All products mentioned are purchased by me unless stated.
All pics, thoughts, etc, are mine unless otherwise noted. Publishing or redistributing any content from this blog is strictly prohibited. Please seek permission first. Thank you.


Related Posts Plugin for WordPress, Blogger...