Showing posts with label elle's tips. Show all posts

6.03.2016

Beauty Secrets From Mexico

Just in case you missed my 7482 Instagram/Facebook/Snapchat posts about it, but I was in Cancun last week. In fact, I'm in Atlanta, but my mind is still very much dreaming about Cancun. I've been to a few cities in Mexico many, many times and this trip was my favorite yet. I can still hear the waves, imagine the great food, and see the sunsets in my mind. It was the most relaxed I'd been in quite a while. 

I have a tradition when I travel overseas of hitting the stores for makeup and beauty products exclusive to that country. I search for snacks too, but that's another post. ;) 

And over the years, I've tried to get as many beauty secrets as I could when visiting Mexico. Most of the women I tried to talk to were busy working, so most of this advice comes from the entertainers at the different resorts. 

They were so gorgeous, so I had to find out exactly what they used. My Spanish was asi asi, their English was better, and together (along with me asking how to spell everything) we made it work. Here are my beauty secrets from Mexico:


--Tepezcohuite--This is a multi-purpose product that comes from the bark of the tepezcohuite tree. It's used for burns and for healing wounds. They use it in hospitals in Mexico. Yes, it works. I've used it for sunburns.

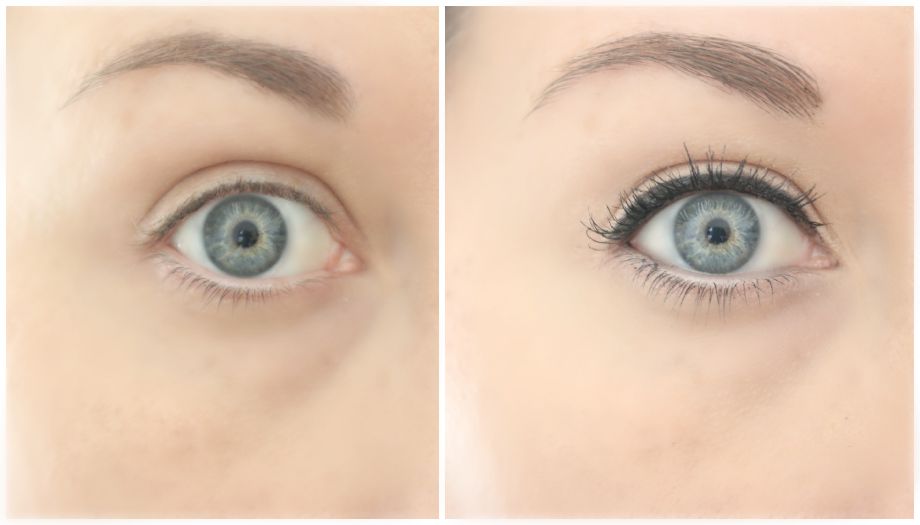
--Mamey Seed Oil--This helps condition lashes and encourages them to grow. I always pick up their IM Mascara, which is really good, and has mamey in it. And it comes in a pink tube! I've shared this a few times on social media over the years. The mascara is practically waterproof on me though!

--Prickly Pear/Cactus Water--I figured out these are the same thing and both are used in so many ways. They drink it (only this kind is safe for humans, not just any cactus). They use it in hair products. They use it to set makeup. It soothes, it hydrates, and it helps to reduce inflammation.

--Babussu Oil--This is so much better than coconut oil! It's not as greasy but gives the same benefits. It doesn't clog pores like coconut oil does (on me). I bought the oil (not in a product, just as is) and have used it on skin and hair. My new fave!!

FYI: You can buy any of these ingredients mentioned on Amazon or other online retailers. I've also found a few of the ingredients in Nuance beauty, which you can get at CVS.

Have you tried any of these before?


Extra Elle:
  • This was a long, short week for me--lots of long hours at work. I posted 6 times--what was I thinking? I know more than one sponsored post in a week isn't ideal, but scheduling conflicts happen, so thanks to everyone who stopped by. I only share products I love and think you will too!
  • Design it yourself shampoo? Click here to find out.

3.15.2016

Make Cheap Eyeshadows Look Expensive


Have you ever purchased an eye shadow only to be disappointed? Waste of money, right? I've found my disappointments to come mostly from drugstore shadows, but I've had my share of duds in the pricey department as well.

Recently I did a huge review of new drugstore eye shadow palettes, and I discussed how I had to make them work, due to their quality. Cheaper shadows can sometimes be chalky and not as pigmented. You can barely see them on the lid! Luckily, I'm sharing some of my go-to methods to help. Here are 4 ways to make eye shadows pop:


1--Flat Shader Brush:
  • As I've said before in my Beginner Eyeshadow Under $5 Tutorial, you don't need an expensive brush for this. Use one that is flat, similar to the one pictured. ELF works. Pat on the shadow. If you brush it on, you won't get as much pigmentation. You'll get fall out--you know where you end up with shadow on your lashes and face.
2--Pat Finger
  • Just like the method above, but use a clean finger to pat on the shadow.


3--White Primer
  • Many of us use a primer already for lids, and depending on the primer, sometimes those only help shadows stay put. 
  • Try a white primer--I really like them on dark skin too. They are a must if you are going for super bright colors. The same concept exists for mascara primers--they are usually white too!
  • Then pat your shadows on top using a brush or clean finger. Here, I used the NYX Jumbo Eye Pencil in Milk. You can get it online, ULTA, CVS, and sometimes Target. They have it in a pot version as well. Maybelline Color Tattoos has a white pot version.
4--Wet Brush
  • I mentioned this technique on my new drugstore eye shadow palettes post, and many of you asked for clarification. Take distilled water and spray a small amount on the brush. I used MAC Fix + here, but I've used makeup setting sprays in a pinch. You can keep distilled water in a small spray bottle for this purpose. If your brush is dripping, it's too wet. Then dip the brush into the shadow. If the shadow now has a pool of water in it, your brush is too wet. Pat the brush onto the lid. Your shimmer shadow will be intensified and metallic.


On your left I used the wet brush with a cheap gold shimmer shadow--see how more intense it is when next to the gold shadow that I patted on?

On your left, I brushed on a shimmery champagne shadow using a regular fluffy brush. You can't really see it! On the right, I used the flat shader brush to pat it on. The flash shows it better but it is definitely more noticeable in person.

Remember, I gave you 4 options, not 4 steps. Just pick the one that works for you.

And here's the final look with the drugstore shadows.

What's your favorite eye shadow palette?

Extra Elle:

10.29.2015

Beauty Quick Tip: Stop Peeling/Rolling Off Foundation


I want to know your beauty getting ready routine. Is there anything specific you do? Do you play music? Maybe watch Youtube videos? Drink coffee? Tell me everything!

That has nothing to do with this post. I'm just curious.

Ok, it sorta has a little to do with this post. Let's talk about foundation.

Have you ever applied foundation just to have it roll right off your face? Or peel off as you're applying it?

Frustrating right?

Today I've got some tips that will help prevent that!

And if you've never experienced this, just keep this post in your back pocket.


Here's why your foundation could be rolling off:

1-Moisturizer/serum/primer/etc is too thick or you applied too much

2-Moisturizer/serum/etc hasn't had a chance to settle in--give it at least 5 minutes before applying foundation

3-If you use a silicone-based primer (like Smashbox) and a water-based foundation (like Too Faced's Born This Way), they never mix and will roll off.

TIP: To make foundation apply even smoother, try dermaplaning.

What's your favorite foundation?

Extra Elle:
  • I think I've decided what to dress up as for Halloween! Did you see the preview of Charlie's costume? It's in my Favorites video!
  • Thank you so, so much for your sweet words on this post.

10.19.2015

Skip These 7 Beauty Buys


skip these beauty buys


First up, I want to thank everyone for the birthday wishes! I had a great weekend full of love and celebration. In addition to birthday shenanigans, including a trip to Oktoberfest in Helen, GA, we hit up some drug stores for makeup. I swear drugstores in smaller towns have a better makeup selection. It's a must when I travel. While strolling up and down the aisles, I was giving my friends recommendations, when I got asked what I didn't recommend. And I thought I'd share 7 beauty buys that I skip after wasting lots of money and time:

beauty products to skip


1-Multicolor blush/bronzer/powder/highlighter

  • These come in a different patterns, like triangles, mosaic, words, shapes, etc, and are swirled together with a brush to apply to the face.
  • Unless each area is big enough for a brush (eye shadows are the exception, usually) I say skip these. It looks like you're getting 3 or more colors in 1 product, but most are impossible to use individually.
2-Covergirl Cheekers Blush

  • I LOVE the CG brand, and these blushes win awards yearly for best drugstore blush. I can't figure out why.
  • I say skip these because the product amount isn't big enough for a blush brush to fit in to grab product, and the colors aren't pigmented enough and/or chalky. 
3-Cream or Gel Blush for Oily Skin
  • If you have oily skin, these products will disappear unless you set them with a matching blush, which kind of defeats the point of the ease and natural look of gel or cream blush.
  • In terms of staying power, there are way more misses than hits for these. I do like Revlon's version (pricey, but it's good).
4-Lip Tints and Balms in Pots/Tins
  • 100% all me here--I can't stand putting my fingers in these pots or tins or containers. This was the main reason why I came up with my DIY solid perfume idea. The germs, y'all. The germs. The stickiness. The fuzz and other stuff that dirties it. The extra product I have to wipe away and waste. I cannot deal. #weirdo
5-Double Ended Brushes
  • Another product designed to save you money and space, right? While the brushes may be of excellent quality, I store my brushes upright, so I always forget what is on the other end. 
6-Travel Brushes
  • Any sort of mini or travel-sized brush always ends up being a waste of money for me, no matter the quality. I always get frustrated and wish I had my full-sized brushes instead. I do find that they are great for kids and sometimes nail art.
7-Cheap Makeup Sponges
  • When I hear the word "dupe" I tend to throw a side-eye, and have found that for most every makeup sponge bloggers swear is a "dupe" for the beauty blender, they're aren't even close. Most of these have latex, are really hard, and perform nothing like a beauty blender. I do like versions from Real Techniques and Soho Beauty.

Which beauty buys do you skip?


PS: I am slowly catching up on emails and visiting your blogs, so I'll be stopping by soon!

9.14.2015

Beauty Quick Tip: Get Thicker, Fuller Lashes


Hey you! I hope you had a great weekend. But first, I wanted to thank you for your feedback on Friday's post. I appreciate your advice so much. Today's Quick Tip is how to get thicker, fuller lashes. No fancy lash growth serums or false lashes required! Just an easy technique I bet you're already doing. 


before/after 


Here's what you'll need:


1--If you're wearing shadow, do that step first. I skipped it here. Next, curl your lashes and apply a volumizing mascara. This is the first trick to making lashes look thicker. I like L'Oreal Voluminous or Dior Show. See the mascara wand (aka spooley) in the pic above? This type of traditional brush gives volume. Wiggle it at the base of the lashes before moving it up.


2--Choose the liner for your upper lash line. Despite the name, the purpose of eye liner isn't to line eyes, it's to make lashes look thicker. Choose from pencil (pictured from last month's IPSY bag), gel (in the collage above), liquid (usually has a felt tip, like you'd use for winged liner), or powder. The trick here is to make sure there is NO skin gap between your liner and the lash line. You wouldn't believe what a common mistake this is!

3--If you're using powder, pencil, or gel, use a clean brow brush (pictured in collage, all price ranges) to really work that product into the lash line to help prevent gaps and get thicker-looking lashes. Wiggle it back and forth to work it in.

4--Here's the biggest trick to get thicker lashes--line the waterline. Not lining this area allows the skin under the lash line to show through and disrupts the illusion of fuller lashes. I admit, using a pencil always makes my eyes water, but when I use a brow brush with product instead, it works. Just gently lift up the upper lashes and press product onto the waterline. Yes, this is safe for contact lens wearers and it doesn't hurt. If the brow brush is too big for you, try a traditional liner brush--it will say it's a liner brush on the packaging. It's smaller and pointed, so it will take longer, but it works just as well.

And that's it! From here you can smudge a shadow underneath the lower lash line (I skipped it here). It looks less harsh than a liner underneath the bottom lash line. If you get transfer of liner from the upper waterline to to lower, you can leave it or you can gently remove. Remember to make sure there are no gaps around your lash line and you're set!

What's your favorite liner? Mascara?


Extra Elle:
  • How was your weekend? I have a cold so mine was spent at Sofa City. ;)  I am feeling a little better and glad I had the weekend off to relax!
  • DON'T FORGET my link up on the 22nd--next Tuesday. Here's more info.

9.08.2015

3 Quick Nanny Tips


If I'm not blogging, you can find me at my day job as a nanny. I take care of a 5 (and three quarters, very important, you know) year old and her baby sister. I recently celebrated my 5th anniversary of working for them! And over the years of being a nanny, I have figured out a few tricks. Here are 3 of them:

1: 1-2-3-Recipes

Kids LOVE to help you. But they are super impatient and have short attention spans. Knock out all 3 of these by using 1-2-3 recipes--these are recipes that have 3 ingredients or fewer. Think banana+egg=pancakes, frozen banana+blender=ice cream, and cake/cupcake/etc in a mug. Kids will learn skills such as teamwork, leadership, patience, and following directions, just to name a few. And if they get messy, that's part of the fun.


2: Shout® Wipe & Go For The New Generation of Stains

Kids are messy, messy, messy (and adorable) humans beings. One of my jobs is to help with the girls' laundry. Kid clothes can be pricey, given how fast they grow, so you want them to look nice and last--a must if the clothes will be passed down to siblings.


Growing up, we had clothing stains like grass, ketchup, or clay. But today, it is totally different. Kids of this generation have those too, but they also have new types of stains like organic baby food (purple carrots with ancient grains anyone?), pressed juices, and kale everything. Luckily, I am a big believer in Shout® to help me out. Shout® is a trusted stain remover and is the only brand I rely on to pre-treat stains and treat stains on the go. The stains disappear and I feel confident I can handle any new stain that comes my way. When I'm out and about with the kids, I keep a stash of Shout® Wipe & Go wipes in my nanny bag.


3: Scrubs
Kids, especially babies, have accidents. The Shout® Wipes are excellent for that. And they somehow always seem to have accidents ON YOU. This is where a pair of scrubs (like you'd see at a doctor's office) come in. Get a cheap pair and keep them in your car for such occasions.  I swear by this tip. Put on your scrubs, pre-treat your clothes with Shout® and throw them in the wash. You do not want to wear wet or soiled clothes for the rest of your work day. Trust me on this one. Shout® gives kids the freedom to have fun and get messy, and it gives parents peace of mind knowing that stains will be gone with a few sprays. 


Visit Shout.com and check out Shout® on Facebook, Instagram and Twitter for more information! #ShoutItOut


I was selected for this opportunity as a member of Clever Girls and the content and opinions expressed here are all my own.

8.21.2015

Beauty Quick Tip For Fine Lines

Hey you! We made it to Friday. I'm still in denial because this week was so long. I'm also in denial on the new fine lines that have decided to take up residence on my face. Maybe it's my age, maybe it's the stress of this year, or maybe I'm the only one who notices it, but I am not feeling those fine lines.

But I have been doing something the past few months that has been working on them and it was a bit of an accident.

I go back and forth on eye creams. Do they work? Are they unnecessary? After seeing those lines pop up, I knew I had to get on a routine.

I've also had fine lines appear around my lips. This was something I wasn't expecting since I'm not a smoker. Was it from occasionally using straws? All of that whistling as a kid? I'm kidding, but seriously, one day I dabbed the extra eye cream (I am admittedly heavy-handed with products sometimes) around my mouth at night. I hate wasting product, so I decided to give it a couple of months. I might have looked a little crazy.

But y'all,

it worked.

I like eye creams from Neutrogena, ROC, Vichy, and Olay. For high-end, Bobbi Brown, Algenist, and Lancome have been favorites, but I am open to suggestions!

So try it and let me know what you think!

Interested in more Beauty Quick Tips?

Extra Elle:
  • Next week I'll be sharing lots of Back to School posts on the blog but they apply to all of us. Hope y'all enjoy.
  • What is the best thing you ate this week? I'm in search of meal ideas.

6.05.2015

10 Summer Beauty Hacks

best hacks summer pinterest tumblr


Hey you! Happy weekend to us! Any exciting plans? If the weather cooperates I plan on being at the pool. Speaking of the pool, today I'm sharing 10 Summer Beauty Hacks that you will LOVE. Nine of these I came up with and all have been tested by me for years. Check out the video below to see them all!


  1. DIY Hair Treatment--1 part conditioner to 2 parts water in a spray bottle. Spray on hair to protect it from the sun, salt, sea, and chlorine.
  2. DIY Hair Detangler/Leave In Conditioner--Use the same recipe as above to keep hair post-pool and the beach tangle-free
  3. DIY Sunscreen Pads--Apply sunscreen to cotton pads. Keep them in a sealed bag in your bag for those times when you find yourself suddenly in the sun for long periods of time (car trips, flat tire, long lines).
  4. Tea Bags--Use the bag and/or black tea for sunburns
  5. Greek Yogurt--Excellent for sunburns if you find yourself without aloe!
  6. Wash & Reapply--If sunscreen breaks out your face, try my tried-and-true trick of washing your face midday (like after 2 or 3 hours, depending on if you're in the water) of wearing sunscreen. Reapply and you won't break out. I also suggest trying mineral sunscreen. I give recommendations in the video!
  7. Deodorant--Great for shaving knicks--just apply a little
  8. Baby Powder for Sand--I swear by this oldie-but-goodie tip to get rid of sandy feet/body
  9. Acne Pads--These soften feet. Instant pedi! Just add polish.
  10. Yogurt for Feet--The lactic acid softens feet. No tub? Just place each foot with yogurt into a plastic bag. I use a big ziploc!
What's your favorite summer beauty hack?

Extra Elle:
  • My #JALS goal for the month is to clean out the clutter, and I plan on doing just that! I'm cleaning the place from top to bottom so I can start the de-clutter process.
  • I've got lots of new products coming to you next week in a haul!
  • I'm kind of obsessed with the doll Barbie's Instagram. It's so cute.
  • Thanks for your sweet words on this post. Y'all are the best.

5.27.2015

10 Ways to Reduce Puffy Eyes

Hey you! I'm back from my week-long vacation! The beach was beautiful and I had an excellent time with friends. This vacation was much-needed after everything that has been going with my Daddy's death two months ago. I don't think I've ever cried this much and puffy eyes have become part of the norm. Luckily, I've got a few tricks to help de-puff eyes if you'd like to see:

5.01.2015

How To: Stop Whitecast in Hair from Dry Shampoo


When it comes to hair product must-haves, dry shampoo is right up there. It is awesome. But the biggest complaint I hear about it is that it gives white cast--when your roots look like you're ready to be cast in a school play about George Washington. If you have brown hair, you know the struggle!

But no worries! Today I'm sharing my best tips to stop white cast from dry shampoo:

4.24.2015

Lip Balm: Over 20 Uses!

A question beauty bloggers get asked the most is, "What is your favorite beauty product?" And to be honest, it's not some exotic cream or the world's most expensive lipstick.

It's lip balm!

Yes, it is one of the most versatile products I own! Today I'm sharing over 20 uses for my ultimate must-have product!


Hair:

  • Tame flyaways
  • Use around the hairline when touching up roots to prevent color bleeding onto your skin
Eyes:
  • Tame unruly brows
  • Rub onto a clean mascara wand and brush through lashes to remove clumps
  • For those of us who don't have oily lids, apply alone or with a shimmery or satin shadow to get them to shine. This looks great in pics and is used by professional makeup artists all the time.
Face:

  • Use as sunscreen in a pinch, if it has SPF
  • You can also use as a highlighter for skin by applying to the places on the face like the bridge of the nose, tops of cheeks, etc. You can mix it with a champagne shadow for an extra glow highlight. --Best for those with dry skin that's not acne prone.
  • Mix with a little blush to make a cream blush
Lips (in addition to the general use of lip balms):

Body:
  • DIY solid perfume--this was published in Bust Magazine!
  • Use plain lip balm to stop shaving nicks from bleeding
  • Rub on heels to prevent blisters
  • Instant moisturizer for knees and elbows
  • Moisturize cuticles
  • Use around nails before painting them to help prevent messes
  • Rub plain chapstick on the back of earrings to help them go in easier
Random:
  • Rub on a stuck zipper
  • Rub on keys that are difficult to use--they will make doors easier to open
Which tip(s) did you like the best?
Which ones were new to you?

Extra Elle:
-I am extra behind on emails, so apologies for not getting back to you yet! But I have read them.
-I feel another cold coming on, so I have no plans this weekend. What about you?


2.24.2015

Quick Tip: Longer Lasting Curled Lashes

I know, I know, you see the pic, the title, and know all about the lash curler. But, hear me out on this quick tip. Ready?

For most of us, we curl both sets of lashes and then move onto another step, whether it's applying shadow or makeup, or even mascara.

Instead, try this tip:

Pick an eye--let's say your left one. Curl lashes on your left eye, then apply mascara for your left eye. Repeat on the right eye.

The trick here is that if you curl both sets of lashes, by the time you apply mascara, one, if not both, will have lost their curl by the time you apply mascara.

Bonus tip: If I am doing mascara on someone with super-straight lashes (like someone Asian) I'll apply a small coat of waterproof mascara to hold the curl.

So repeat with me: curl then mascara...curl then mascara. Not curl, curl, mascara, mascara.

Extra Elle:

  • It's currently snowing as I write this! Oh, it'll be gone in about 5 minutes, but I love the peacefulness of watching it snow.
  • My Disney cold has returned. I went to sleep at 9 last night. 9!!! I'm usually a night owl-early riser. Hope your day is going well!
Ignore the lack of makeup (sick day) but can you tell the difference? 


2.20.2015

My Secret Trick for Red Carpet Beauty


I was at an event the other night, when I got asked what my must-have beauty tool is. "You can tell me!" she said. "Let me guess--some special cream from an ancient land made with unicorn tears?" she joked, but was completely surprised when she heard my answer. I leaned and and whispered my secret trick:

2.03.2015

How To: Kiss-Proof Lips

With Valentine's Day coming up, I thought this tutorial might be just right to share. It works well for any occasion you're wearing lipstick and don't want it to come off (especially on the one you're kissing). I've seen it happen! Perfect for dates and, of course, the wedding day! Oh, and it's baby-proof! More about that later!

1--Exfoliate
No brainer here, but making sure you have a clean, soft lip to begin with will help with lipstick application. Use a warm, wet washcloth to gently exfoliate lips. Better yet, use this diy lip scrub that takes a minute to make.

2--Moisturize
Keep those lips soft by adding a lip balm of choice. Let it soak in while you apply your makeup and do your hair. Just leaving it on at least 5 minutes will help.


3--Apply Long-Wearing Liquid Lipstick
I wanted to keep this process as easy as possible. And instead of liners, powders, tissues, etc, I'm going with a long-wearing liquid lipstick. There are lots on the market, but the one I'm using today is from Rimmel. These are Provocalips--they can be found in drugstores, and come in many colors. They don't give me the 16 hours they claim, but I've really been liking them. It has color on one end and a gloss on the other. I've got a big review of all the drugstore ones like this coming soon (just let me know if you're interested).


Wipe off the lip balm and then make a fake smile. This will allow you to make sure to get all the lines in your lips when applying the color.  This is pretty easy to apply using the doe foot applicator, but if you still feel intimidated, use a lip brush or a small brush to brush on. Don't paint on a thick coat. A thin, even coat is all you need--just like when painting your nails.

Allow to dry. I usually just hold that fake smile for a few seconds.

4--Apply lip gloss (or balm)
Once dry, apply the lip gloss provided. You'll need a balm or gloss of some sort to keep your lips hydrated. Every brand I've ever tried of these long-wearing lipsticks are matte. Luckily, these come with a gloss that's not sticky at all--it really just makes it shiny, but others have a clear balm. You will need to apply the lip gloss as needed throughout the day/night but do not reapply the color.

For this demo, I forgot to bring the Provocalips with me for work but made it through eating, drinking, and an entire work day with 2 little ones, including a 10 month old who was perplexed that she couldn't take the color off my lips with her fingers pawing at me. Baby proof!

To remove: Use an oil-based makeup remover. It's the fastest way.

Extra Elle:

  • Getting my hair done (begone, evil roots!) today!! Expect a pic (a hairfie?? hehe, jk) on Instagram. Do you like getting your hair done?
  • Speaking of Instagram, I posted a pic referencing that 1-31 was the 95th anniversary of my great-grandfather bringing his family from Lake Como, Italy to America! I never knew him, but got to visit Lake Como 10 years ago. My mom still has the immigration papers! Are you a genealogy fan like me?


Disclaimer:

All products mentioned are purchased by me unless stated.
All pics, thoughts, etc, are mine unless otherwise noted. Publishing or redistributing any content from this blog is strictly prohibited. Please seek permission first. Thank you.


Related Posts Plugin for WordPress, Blogger...