Showing posts with label decorating. Show all posts

4.04.2017

DIY Faux Marble Coasters and Bowls

Hey y'all! It's been a while since I've had a DIY on here, so I thought I'd share one that takes 5 minutes to make and would look great at home: diy faux marble coasters and bowls!

You'll need--

polymer clay (I used white, black, and grey, but choose whatever colors you'd like...I've done this with neon colors too)

paint pen or nail polish

Mod Podge

Oven

Circle for tracing

Knife

Line up your clay colors. I broke the white into 4 pieces. I placed two white, one grey, one black, two white, and one grey next to each other. Then I twisted them together, like a snake, as pictured above. Keep twisting and rolling until you start to see a marble effect. The more you twist, the lighter the color of the marble will be.

Roll out into a sort of circle shape. Try to keep it even on all sides. Place your pattern (I used a coaster, haha) on top of the rolled out clay and cut around it with a knife. Remove the excess and reuse it desired. Bake according to package directions. Once cooled, seal with Mod Podge.


Add an extra touch to the edges with a metallic paint pen. I've also used nail polish for this too. You can also paint onto the clay--like try half marble, half painted. I've made these lots of times for others so many different ways!


Here's the finished piece! I was able to get two coasters from the amount of clay shown in the first pic. I used circles here for the demo since they are super easy, but I've made these in hexagons and squares, too.


I've also made bowls. I simply followed the same steps (I used more grey and black) and traced around a bowl as my pattern. I placed the clay inside of the bowl (I have also placed the bowl upside down and the clay on top). Then I placed the oven-safe bowl and clay inside the oven and followed directions to bake. I wouldn't use these for food, but they make great decor pieces. I also didn't mind the rawness of the edges.


Are you a fan of marble?

Extra Elle:
Still hanging in there--please be patient as I am slowly, slowly getting caught up on blogs and emails. I am feeling better!

9.04.2015

Over 20 Ideas for Empty Candle Jars!

This shop has been compensated by Collective Bias, Inc. and its advertiser. All opinions are mine alone. #LoveAmericanHome #CollectiveBias


Fellow candle fanatics, this post is for us! Do you switch up your candles for the season? I've mentioned it many times on here that I do. And since fall is around the corner, I headed to Walmart to stock up. I was immediately drawn to the American Home™ by Yankee Candle® brand candles display in the Home and Candle section:


I checked out all of the fragrances (of course!), and here's what I brought home with me:


These are a few different styles and sizes, but I bought the 12 oz. candles in Shades of Fall, Pumpkin Apple Harvest, and Banana Walnut Bread for $10.93. Remember to use candles with caution.


And I picked up this 2 oz. jar candle in Fresh Apple for $10.93. My house smells kind of amazing right now! But what to do with the empty candle jars at the end of the season? I've got a bunch of ideas to reuse them. First, I will freeze them for a few hours once I have burned the candle up. The remaining wax and cotton wicks will pop right out. Then I wipe out the inside and peel away the label. I wash and dry the jar and then it's ready to reuse! Check out over 20 ideas for empty candle jars:


Storage For Bathroom:
  • cotton balls
  • cotton swabs
  • cotton squares or pads
  • toothbrush and toothpaste
  • small jewelry--great way to keep rings from getting lost


Beauty Storage:
  • makeup brushes
  • lipglosses, lip sticks, lip crayons, lip balms
  • bath bombs
  • bath salts (mine are the purple ones pictured below)
  • nail polishes
  • manicure kit
  • bobby pins
  • hair ties
  • beauty samples


More Storage Ideas

  • candy
  • markers
  • craft supplies
  • crayons
  • dog treats
  • coins


Decorative Display:

I chose to take one of the empty tumblers and made an etched monogram:


DIY Etched Tumbler:

  • Using a clean, empty candle jar, place your letter/monogram/picture inside.
  • Take an etching cream purchased from the craft store and a small paintbrush and outline and fill in the letter on the outside of the jar/tumbler. Pictured.
  • Allow cream to set for 5 minutes and then rinse away. Be sure to follow directions and use precautions as printed on the etching cream's packaging.
Let me know your favorite candle fragrance or storage idea!

9.23.2011

Elle Entertains: Movie Under the Stars

Happy first day of fall! One of the items on my Summer Bucket List was to host a Movie Under the Stars. And recently, I did! However, everything that could've gone wrong did. Sad face. But like any good (ha) hostess, I quickly changed plans and rallied. Even though things didn't turn out like I planned, everyone had fun. Happy face. This party was really cheap to put together too. Pass the popcorn, because you're invited:
{inspiration before Mother Nature Changed Said Plans}

{1,2,3}
  1. My DIY project of paper bag luminaries was super easy--just use a hole punch! Unfortunately, it rained most of the day so I saved these and will use another time.
  2. I wanted to use bean bags and such to lounge on, but it was too cold and wet so beach chairs came to the rescue!
  3. Because of the rain, we ended up not using a backyard movie screen, but here's how to make one. Luckily, I had a friend who owned a projector, which we hooked up through his computer to play the movie. We kept all equipment on the porch and showed the movie on the side of the apartment building.
{1,2,3,4}
  1. To keep it all super cheap, I just used typical movie snacks, but with a twist--we had a Popcorn Bar. Candy, butter, seasonings, were offered to good ole microwave popcorn. 
  2. I made these Rum & Coke Slushies but it was so cold, I had hot chocolate on hand too.
  3. Mexican Coke was available too. And I totally think I can tell the difference despite what studies say!
  4. Cute straws make anything taste better. Am I right?
So there ya have it: my budget-friendly Movie Under the Stars. I definitely want to try this again in autumn and already have lots of ideas a-brewing.

Have a great weekend! What're your plans? I'm hanging out with my Lil Sis.
PS: I'm Guest Posting for Molly on A Foreign Land....go check it out!

9.12.2011

DIY: Cupcake Liner Lights

Edit: File this under "this was supposed to be posted last month." You may recall I did a Pizzazz Your Patio post and was supposed to include this DIY. Oops. I decided to post this anyway since I honestly use my patio/balcony area more in autumn, since it's so freaking hot here until December October. And this fits my criteria when it comes to the DIYs I do: quick, easy, and cheap. This is also very easy to customize--think bedrooms, dorm rooms, mantel, parties, etc. Or think colors/patterns. 
Let's see how I did it:


I was planning and plotting my next party, an outdoors one, and was thinking about lights. I came across all sorts, like these:
Typical me, I thought, I could make that! Or something like it! But I wanted to spend zero to $1. And that's how I came up with this idea (edit: thanks for the emails notifying me of other liner ideas! such savvy readers I have!)
I had lights and scissors on hand. The only purchase would be the liners, which I got for about $1 on sale. The liners match my patio furniture, so that's why I picked this pattern.
To assemble, simply fold the liner in half and cut a tiny slit. Cut as many as are needed for lights.
 Poke the lights through the slits in the liners. Hang lights as desired.
{finished}
NOTES:

  • I figured since the liners are obviously ok to bake with, it didn't matter the type of light. IF this bothers you, use LED lights. 
  • I used lights I had on hand, which were smaller, but bigger bulbs would be beautiful too.
  • Use colored lights! (Note to self: get some colored lights!)
  • My lights are suitable inside/outside, so check if yours are. Dollar stores have sales on lights often.
  • Match the liners to decor or to situation, like if you're hosting a party, for example.
  • Some liners are colored on the inside, which makes for an even a cooler glow. (Note to self: get more liners!)
Enjoy! Love, Elle


8.05.2011

How to: Pizzazz Your Patio on a Budget

An oft-neglected area of the house is the patio. When the weather’s just right, a balcony/porch/patio becomes another room. And it doesn’t matter the size of the space or budget—it’s easy to Pizzazz Your Patio! (Don’t you just kinda love the word “pizzazz?” It has 4 z’s! When do you get to use 4 z’s, other than Zzzzzz?) Click pic to learn more about each item.

patio furniture

  • Think of your space: what you'd like to include to make your patio comfortable, your budget, your style, and your needs. Will it just be a seating area? Or will there be dining in this space? How many people will, on average, be sitting there?
  • Let’s start with the basics: first, you’ll need somewhere to sit. Even if it’s just one chair, you can find a chair cheaply. Thrift store & Craiglist finds can easily be spruced up with paint. Other options: an outdoor couch, bean bag, rocking chair, hammock (I have one on my tiny patio but take down for entertaining), beach chair, or porch swing.
  • Next, you might want a table, ottoman, or something to set down a nice, cool drink. Bistro sets are so cute and perfect for small areas. Wooden TV trays can be used as small tables in a pinch. Add a cute tray to hold/serve drinks--an excellent way to add color too.
Now that we have the basics covered, let’s start accessorizing! What colors do you envision for your patio? Click the pic for more info.

pizzazz your patio


  • Pillows add punch to chairs and can be purchased for so cheap! Wanna make them yourself? Here is a link to no sew cushions.
  • An outdoor rug also adds some color and comfort to a space.
  • Add a bit of greenery to your patio. In the inspiration pic above, check out the balcony rail garden or even a tiny matchbox garden.
  • Living in the city, the only birds I see are pigeons. But I'm smitten by the idea of a bird feeder and the two shown above can be made for only a few dollars each! So easy. 
  • Candles, lanterns, and string lights add ambiance when the party continues into night. These solar lights in a jar can be made with materials from the Dollar Store!
  • Bring the beach or lake to you with a water feature.
  • Optional accessories: grill (many apartments allow a gas grill), fire pit, tiki torches, colorful napkins or place mats, a cooler to hold ice/drinks, or a drink dispenser.
Remember, to keep things on a budget, try to use objects with more than one function: an ottoman can be a seat or mini table. If the ottoman opens up, use as extra storage or line with a clean trash bag full of ice for an instant cooler. A charcoal grill can be used as a fire pit. Use a candle that also serves to ward off mosquitoes (try citronella or peppermint). And just because it's on your patio doesn't mean it has to stay there year-round. I often bring objects from inside, outside for entertaining/relaxing.
    Need more inspiration?

    12.16.2010

    Ask Elle--The Holiday Edition


    Maybe it's because I'm a people-pleaser & a Libra (when I finally decide on something, I really decide & never regret) but I just love giving out advice. Have a question on anything? I'm up for the challenge. Feel free to leave a comment, Twitter me, or email me @ elleseesyou@gmail.com. I can't wait to help you!

    This month's question deals with decorating and comes from Amy who asked, "I liked your post about not using a tree. What's the easiest/fastest/cheapest way to decorate my apartment for the holidays? I don't want to put a tree up but I still want a little holiday sparkle." 

    Hmm, tall order Amy, but I think I can help you out. One of the best decorative items I've bought for my home is a glass vase. I consider it to be one of those basics you need in your house, kind of like how an LBD is a basic in any wardrobe. 

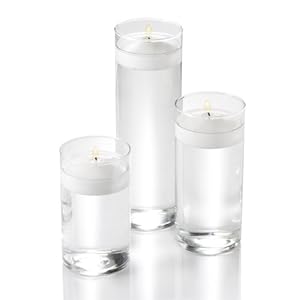
    There are so many types to choose from such as a tall cylinder or a hurricane lamp. These can be found pretty cheaply (I've even seen these at the dollar store). You want one big enough to put things in and to get them out. By having a vase, the possibilities are endless, and it's usable year-round. PS-- No vase? Use a glass bowl, cake stand, trifle bowl, or even wine or martini glasses. 

    Candle: Put a glittery large candle in the vase--again, these can be purchased cheaply. Done and done. Another option is to fill the vase with water and float a candle in it. Want something more festive? Then the next options are for YOU! 


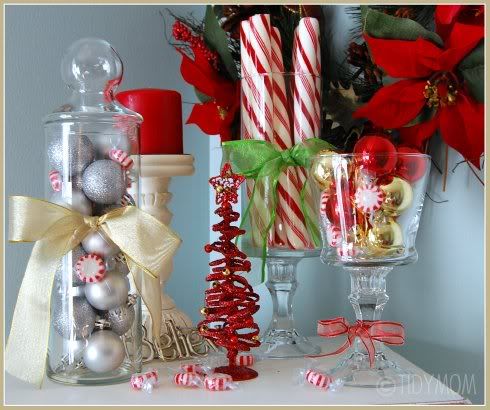
    Bulbs: Fill the vase with ornaments from the dollar store or even ornaments you already have. It's easy and classic. The balls can be all one color or you can mix it up. Try different sizes as well.
    Bring Nature Indoors: This is usually free (perfect for a budget). Try pine cones, greenery, or flowers. Pine (great smell), acorns, holly berries, or poinsettias (neither are poisonous but I wouldn't suggest eating them as you'd feel yucky afterwards).  

    Food: This can be done cheaply as well, and can be combined with the options above. Apples are red and the easiest but let's get a little more in the holiday spirit, shall we? Cranberries look very nice when topped with a candle. Or you can go crazy and layer different fruits. I use fruit when it's not the holidays (think lemons & limes in the summer). A combo of fruits and nuts is another option. 
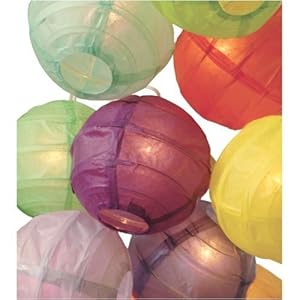
    Lights: This is one of my favorite ideas and in a small way brings in one of the best parts of a tree: the lights! There are battery-powered ones as well.

    Extras: Sand, colored stones, marbles, beads, water, candy, or decorate the vase on the outside (email me if you go this route for ideas)
    Look at this great Dollar Store Christmas decorating! Find out how she did it here:

    I hope these tips helped and I can't wait to see what you've come up with!
    Disclaimer: Use caution when dealing with open flames, lights, and chokeable items. Safety first!
    PS--Have you entered my GIVEAWAY?

    Disclaimer:

    All products mentioned are purchased by me unless stated.
    All pics, thoughts, etc, are mine unless otherwise noted. Publishing or redistributing any content from this blog is strictly prohibited. Please seek permission first. Thank you.


    Related Posts Plugin for WordPress, Blogger...