Showing posts with label ask elle. Show all posts

4.14.2017

Setting vs Finishing Powder--What's the Difference? Ask Elle

Hey y'all! So yesterday I shared a possible dupe for MAC Mineralize Skinfinish vs. NYX #NoFilter Finishing Powder. Check it out here. And the number one question I got was would these be good for oily skin?

I knew that this post was in order.


First, powders can be loose or pressed. Pictured above is a loose powder. Pressed powders come in compacts.

There are two types of powders: setting and finishing.


Setting powders are used with foundation and set the makeup--oily skin, you'll find these necessary. They set the makeup and allow it to stay all day.


Finishing powders are used to give an effect, like hiding fine lines, or brightening, and allow skin to look great in pictures. You can put it on top of setting powder. They are the finishing touch and aren't a necessity. These are what I shared on my post yesterday.


And now you know the difference!

Extra Elle:
Getting my hair done this weekend!
Looking forward to getting caught up on everything over the weekend.
HAPPY EASTER weekend!


9.14.2015

Beauty Quick Tip: Get Thicker, Fuller Lashes


Hey you! I hope you had a great weekend. But first, I wanted to thank you for your feedback on Friday's post. I appreciate your advice so much. Today's Quick Tip is how to get thicker, fuller lashes. No fancy lash growth serums or false lashes required! Just an easy technique I bet you're already doing. 


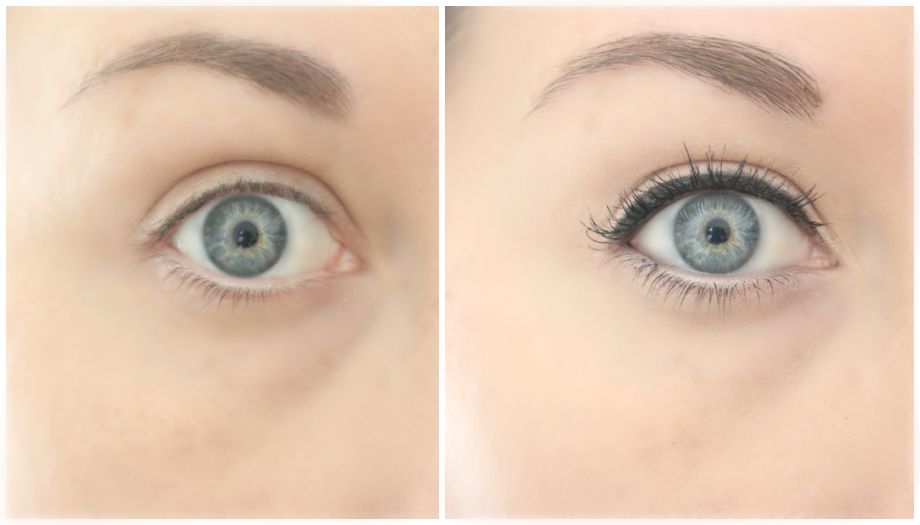
before/after 


Here's what you'll need:


1--If you're wearing shadow, do that step first. I skipped it here. Next, curl your lashes and apply a volumizing mascara. This is the first trick to making lashes look thicker. I like L'Oreal Voluminous or Dior Show. See the mascara wand (aka spooley) in the pic above? This type of traditional brush gives volume. Wiggle it at the base of the lashes before moving it up.


2--Choose the liner for your upper lash line. Despite the name, the purpose of eye liner isn't to line eyes, it's to make lashes look thicker. Choose from pencil (pictured from last month's IPSY bag), gel (in the collage above), liquid (usually has a felt tip, like you'd use for winged liner), or powder. The trick here is to make sure there is NO skin gap between your liner and the lash line. You wouldn't believe what a common mistake this is!

3--If you're using powder, pencil, or gel, use a clean brow brush (pictured in collage, all price ranges) to really work that product into the lash line to help prevent gaps and get thicker-looking lashes. Wiggle it back and forth to work it in.

4--Here's the biggest trick to get thicker lashes--line the waterline. Not lining this area allows the skin under the lash line to show through and disrupts the illusion of fuller lashes. I admit, using a pencil always makes my eyes water, but when I use a brow brush with product instead, it works. Just gently lift up the upper lashes and press product onto the waterline. Yes, this is safe for contact lens wearers and it doesn't hurt. If the brow brush is too big for you, try a traditional liner brush--it will say it's a liner brush on the packaging. It's smaller and pointed, so it will take longer, but it works just as well.

And that's it! From here you can smudge a shadow underneath the lower lash line (I skipped it here). It looks less harsh than a liner underneath the bottom lash line. If you get transfer of liner from the upper waterline to to lower, you can leave it or you can gently remove. Remember to make sure there are no gaps around your lash line and you're set!

What's your favorite liner? Mascara?


Extra Elle:
  • How was your weekend? I have a cold so mine was spent at Sofa City. ;)  I am feeling a little better and glad I had the weekend off to relax!
  • DON'T FORGET my link up on the 22nd--next Tuesday. Here's more info.

8.25.2015

The BEST Way to Remove Glitter Polish (And It's Not What You Think)


I might be addicted to collecting nail polish. I have around 352 bottles. Included in that would be my love for glitter polish. I know not everyone is a year-round fan, but with school starting, football and holidays coming soon, I thought this tip would be perfect to save for later. For this week's ASK ELLE  Natalie via Facebook asked me how to remove it. And that is the biggest pain, right?

I'm testing out 5 of the top ways to remove glitter polish and sharing my results after lots and lots of glitter polish testing--you name the type of glitter, I've tried it. So when I say this is the BEST (and fastest) it really, truly is.

nails before: base coat with 3 different types of glitter

Removal was tested using various techniques, and I narrowed those down to the 5 fastest. Testing was done using various types of glitter polishes and ranged from freshly painted glitter nails to nails that had been painted over a week. Enough of the boring details, let's get to the methods!


Test 1: The Tinfoil & Cotton Method:
  • I don't know where I heard this one, but it really works. Essentially you take cotton balls (some sort of cotton product) and soak it in remover, preferably acetone. Place on nail. Then wrap this with a small strip of tin foil around your finger. Leave for 5 minutes and then remove. Pictured above is the store bought version--you can get these at CVS and I've seen them at Dollar Tree. Remember you will need to add polish remover to the cotton pad.


Test 2: The Nail Soakers
  • I got these for a couple of dollars from Ebay. You pour a little remover into a nail soaker. Pop your nail into it and wait a few minutes. Then remove and wipe away the glitter.


Test 3: Sephora Instant Nail Polish Remover for Glitter 
  • Filled with an acetone-soaked sponge with one scrubby side for removing glitter polish
Up&Up (left), Nail Aid (right)


Test 4: Up&Up Nail Polish Remover Dip-It
  • Similar concept to the Sephora one, but this is plastic, with plastic spiky scrubbers--just twist the nail to clean. Get this at Target.
Test 5: Nail Aid No Rub Glitter Polish Remover Gel
  • Dip finger into gel. Leave for 4 minutes and then wipe away. I found this at Walmart.

after
Results:
  1. Tin Foil with Cotton Ball--works well, but the preparation and waiting takes time. I found the store-bought wraps seemed to work the best and a little faster. In this test there is some glitter remaining around the nail bed. Removal time was around 1 minute to 4.
  2. Nail Soakers--These work but are so uncomfortable--there's almost like a suction when you put them on your nails. In the test pictured above, there is still some glitter on the nail. These had to soak for around 2 minutes.
  3. Sephora--This was my go-to for the longest time. The sponge can wear out and shift quickly but it works. This completely removed all traces of glitter in about 15-20 strokes. Second place winner.
  4. Up&Up--This is the winner. Hands down. It completely removed everything in 5-10 strokes (or dips) into the remover. 
  5. Nail Aid--This is SO cold, so make sure only the polished part is coated in gel. This took 1-4 minutes of waiting time. There was still a little clean up of glitter after.
What's your favorite nail polish shade?

Extra Elle:


8.19.2015

Ask Elle: MAC Lipstick Finishes 101


For this week's Ask Elle: Amanda wants to know,

"I want to buy my first MAC lipstick. Which one should I get?"

Amanda, I get this question often! With over 187 shades to choose from, the better question is which MAC finish would you like? Some are sheer, some are matte, and so on, so today I'll explain MAC lipstick finishes.


from l-r
Oblivion, Flamingo, Twig, Creme Cup

Amplified: Creamy, smooth, pigmented and a little shiny--this is my favorite finish since the color payoff is so wonderful.

Lustre: Sheer to medium coverage and very lightweight--this is very shiny but not sticky. Despite owning 3 in this finish, I usually skip this one.

Glaze: Not pictured because I do not own any of these--this is the closest to a lip gloss. Sheer, lightweight with a lot of glide. A semi-pearl finish.

Satin: Creamy with medium to full coverage--this has a satin shine to it.

Cremesheen: Creamy balmy formula with a medium coverage--semi-glossy


from l-r
Flat Out Fabulous, Angel, Strange Journey


Retro Matte: Very intense color and very matte--these last all day but can be very drying. Ruby Woo is the most famous shade from this finish. You recently saw the color I am wearing in this Raspberry Lips post.

Frost: Smooth with medium coverage with a semi-glossy pearl finish--I know the term "frost" sounds like something old school, but it's really a nice finish.

Matte: Creamy with high-color payoff--no shine and one of my faves


For more info visit MACCosmetics.com

See also: 

What's your favorite lipstick?
Leave your beauty questions below to be featured on a future Ask Elle

Extra Elle:
  • Notice anything different? I'm ElleSees.net--I changed it about a week ago.
  • I was chosen by FabFitFun as the best summer unboxing video! Made my day!!!
  • Officially over all of this rain! At least it is cooling it down a little.

8.06.2015

Ask Elle: My Quick & Easy Skincare Routine

This shop has been compensated by Collective Bias, Inc. and its advertiser. 
All opinions are mine alone. 
#ANaturalClean #CollectiveBias


Time for another Ask Elle, where I answer your beauty questions. Check out past Ask Elle posts here. Stacia recently asked:
Hi Elle! I'm looking for a quick and easy skin care routine. I don't want a lot of steps and prefer products that are as natural as possible. My skin is slightly dry.
Stacia, I've got everything you asked for and more! You're in luck because these are products that I use daily and love, all from Burt's Bees! And everything can be found easily at Target:


Burt's Bees believe that what you put on your body is just as important as what you put in it. Their products support your skin with nutrients it needs—and none of the chemicals it doesn't. Plus, on average, Burt's Bees is 99% natural. Over half are 100% natural.


The first product I use is Burt's Bees Cleansing Oil. Have you tried this before? It's NEW so I had to get it. This is no surprise to you, is it? It makes a great first step to my skincare routine.

Burt's Bees Cleansing Oil gently removes dirt and make-up, but won't leave an oily residue! It has natural moisturizers, including Coconut and Argan oils, which cleanse and soften skin naturally. It won't clog pores and doesn't irritate skin. And there are no parabens, phthalates, SLS or petrolatum. LOVE it.

Step 1: Burt's Bees Cleansing Oil for clean skin--makeup is gone!

To use:

1. Dispense product into dry hands.

2. Gently massage over dry face.

3. Wet hands and gently continue to massage product onto face.

4. Rinse thoroughly; pat dry.

To learn more about Burt's Bees Cleansing Oil, click here.

Step 2: Burt's Bees Renewal Firming Day Lotion SPF 30
Now the Cleansing Oil isn't a standalone product, so for the next step, I suggest Burt's Bees Renewal Firming Day Lotion. This is a lightweight face moisturizer with natural broad spectrum SPF 30. It's clinically shown to help reduce the appearance of deep lines and wrinkles and improve firmness. I just apply to skin with clean fingers and gently massage into skin.

Makeup-free selfie time=clean and moisturized skin.
And that's it--my quick and easy skin care routine. What do you think?


Check out these links for more info:
Twitter: @BurtsBees
Facebook: https://www.facebook.com/burtsbees
Pinterest: https://www.pinterest.com/burtsbees
Instagram: @BurtsBeesUS
YouTube: https://www.youtube.com/user/burtsbeesvideos

Have you tried the Burt's Bee Collection? I'd love to hear your favorite!
Have an Ask Elle question you'd like answered? Leave it in the comments.

5.15.2015

Ask Elle: Quick Makeup, DIY Body Butter, Primers, And More!

Happy weekend to US! Before I get into answering your questions, I'd like to remind you that it's the FINAL DAY to enter to win $100 to Sephora. Come on, you know you wanna!! 

Today I've got a fresh batch of cookies questions on beauty and life, so let's get started!

5.06.2015

Ask Elle: Makeup & Starbucks


I'm back with another edition of ASK ELLE! I'm answering your beauty and personal questions. Enjoy!

4.29.2015

Ask Elle (Your Beauty Questions Answered): Best Dupe & Camera Comfort

Each week I'll be answering your beauty questions (feel free to submit more in the comments) as well as personal questions (submit those too!)

Marie J and Kim Pincombe asked me about dupes. Marie asked, "What is your best dupe?"

It's the .99 Jordana Matte lipstick in Tangerine Tango, pictured below:

4.24.2015

Lip Balm: Over 20 Uses!

A question beauty bloggers get asked the most is, "What is your favorite beauty product?" And to be honest, it's not some exotic cream or the world's most expensive lipstick.

It's lip balm!

Yes, it is one of the most versatile products I own! Today I'm sharing over 20 uses for my ultimate must-have product!


Hair:

  • Tame flyaways
  • Use around the hairline when touching up roots to prevent color bleeding onto your skin
Eyes:
  • Tame unruly brows
  • Rub onto a clean mascara wand and brush through lashes to remove clumps
  • For those of us who don't have oily lids, apply alone or with a shimmery or satin shadow to get them to shine. This looks great in pics and is used by professional makeup artists all the time.
Face:

  • Use as sunscreen in a pinch, if it has SPF
  • You can also use as a highlighter for skin by applying to the places on the face like the bridge of the nose, tops of cheeks, etc. You can mix it with a champagne shadow for an extra glow highlight. --Best for those with dry skin that's not acne prone.
  • Mix with a little blush to make a cream blush
Lips (in addition to the general use of lip balms):

Body:
  • DIY solid perfume--this was published in Bust Magazine!
  • Use plain lip balm to stop shaving nicks from bleeding
  • Rub on heels to prevent blisters
  • Instant moisturizer for knees and elbows
  • Moisturize cuticles
  • Use around nails before painting them to help prevent messes
  • Rub plain chapstick on the back of earrings to help them go in easier
Random:
  • Rub on a stuck zipper
  • Rub on keys that are difficult to use--they will make doors easier to open
Which tip(s) did you like the best?
Which ones were new to you?

Extra Elle:
-I am extra behind on emails, so apologies for not getting back to you yet! But I have read them.
-I feel another cold coming on, so I have no plans this weekend. What about you?


4.23.2015

5 Mascara Hacks: Do They Work?


Y'all--this post is SIX months in the making.

I told y'all yesterday, I am extremely thorough when it comes to reviewing and testing beauty products.

So today I'm testing out 5 of the top hacks and myths for mascara, longer lashes, fuller lashes and more.

4.22.2015

Ask Elle: Foundations & Frustrations


A few years ago I used to do an Ask Elle series. I switched it to a yearly video where I answered any and all personal as well as beauty questions. I've decided to combine the two and bring back the series. I'll answer one beauty and one personal question weekly for the next month (or more, if you like).

8.15.2014

5 Ways to Apply False Lashes


For this week's How To Tuesday (er, Friday), I'm talking about false lashes. Applying false lashes can be one of the most intimidating beauty things, right? But it doesn't have to be! Today I'm sharing 5 different techniques to try.

Before you begin, you'll need the right tools. Let's start with lashes--these can be as cheap as $1 from ELF and up, way up. I personally like Ardell (love the Demi Wispies) and Salon Perfect (these can be found in drugstores and "box" stores) as they work well and aren't too expensive.

Lash glue is the second most important tool to have. Many people love Duo glue, but it smells like fish and irritates my eyes. I like Revlon's lash glue as it is latex-free. If you aren't sure if you're allergic to latex, try a small test patch. Choose clear or black lash glue. Dark looks a bit more natural, but it isn't required.

The biggest tip I have for you is to practice. Hold the eyelash in your fingers and bend it, to get a feel for it. Usually thinner bands work better, but a thick band is good to practice on. Until you get the hang of applying lashes, try using a lash tweeze tool, like the one from KISS above. Some people use actual tweezers to apply lashes. You'll definitely need tweezers if you're using individual lashes.

Other tools to have: lash curler--blends false lashes with your actual lashes, eyeliner--helps hide the band of the falsies, scissors--to trim lashes (see below)

Now that you've gotten your tools and lashes ready, let's inspect them a bit further. See how they are tapered? Take a false lash and place the shortest end of the falsie near the inner corner of your eye. Now hold the other end of the lash at the outer corner of your lash line. Are the lashes too long? If that is the case, try trimming them, but on the largest end only.

Apply a thin line of glue to the lash band and allow to get tacky for about 30 seconds-1 minute. Now, there are 5 different techniques to try to apply them:


METHOD 1: Sometimes it's easiest to work with lashes if they are smaller, so using scissors, cut them in half (or even thirds) before applying glue. I learned this tip from RuPaul! Just be sure to keep the strips in order by size. This is the first tip I recommend to readers when they ask me how to apply lashes. It works.

METHOD 2: Using a tool (like the one pictured above) or your fingers, place the smallest end of the fake lash in the inner corner of your lash line. Keep pushing it in the lash line until you reach the end.

METHOD 3: Use the same technique as above, except this time, place it in the center, press it down and then press down the ends into the lash line. This is the technique demonstrated above.

METHOD 4: Same as above, but apply it from the outer edge to the inner. The opposite of Method 2.

METHOD 5: This is the last resort method but it works. Be sure your skin isn't allergic to lash glue and that you don't have sensitive eyes. If you passed those tests, then apply the lash glue to your lash line. Allow 30 seconds to get tacky to the touch, and then apply your lashes (no glue on them) using method 2, 3, or 4. I admit, I tend to lean towards this method because it is the fastest for me. Try keeping the glue out of your actual lashes, as it is a hassle to clean.

Bonus Method: To fill out lashes or as a more natural-looking approach, try individual lashes. Place a dollop of glue on a clean surface, and using tweezers, dip the lash (3 are pictured above and they look much larger than they are) into the glue. Place it on a clean surface for a few seconds to get tacky. Repeat for the rest of lashes. I suggest using only 2 or 3 and placing these in the outer corner for fullness. Use your tweezers to place lashes along the lash line. Four or five lashes starts to look unbalanced, so either do two or three, or make sure to add them to the entire lash line.

FOR ALL METHODS: Allow the lashes to set/dry for a minute. Then, use a lash curler to gently bind the natural with the false lashes, otherwise you'll have a noticeable gap. Add eyeliner along the lash line. Some like to use mascara to help blend the natural with fake, but it isn't necessary.


Did you know you can reuse those lashes a few more times? Yes! This is especially important if you're using expensive lashes or those made from actual hair (like mink lashes). Simply use some eye makeup remover and a Q-Tip to remove the lash adhesive from the lash.

Now they are ready to be reused, so it's time to store them. I like using a days of the week pill case to easily store them--great for travel too.

TIPS:

  • Add the most glue to the ends, as those are usually the hardest to keep in place.
  • Make sure to press down the entire lash--beginning, middle, and end.
  • Remember to apply to the lash line, as close as you can get, but not on the actual lashes.
  • If using individuals, keep track of how many you added, so that you can be sure you removed them all. Just speaking from personal experience here!
  • Do a patch test of the adhesive to see how your skin reacts.
That Friday Blog Hop

1.10.2014

Ask Elle: Best of Beauty Boxes


Do you have any monthly subscription boxes? I've tried out several, and I get asked this question fairly often, especially since it's a new year. Today I'm sharing favorites. Enjoy.

Birchbox--This was the first sub I ever had and I was a member for a year!
  • High-end beauty and lifestyle samples
  • $10 month ($20 for men)
  • Questionnaire profile
  • Samples and full-size
  • Point system to redeem on items in the shop or you can purchase them as well
  • Best For: Fans of and occasional makeup users; you get to try high-end products you might not have been exposed to otherwise
    •  I received mostly skincare samples, even after changing my profile, so I didn't like all of my boxes. However, most people are huge fans
      • Similar sub I'd like to try: Glossybox

Wantable--Features subscriptions for makeup, intimate apparel, and accessories
  • The best in beauty, curated by an industry insider
  • $36 month ($40 one-time purchase)
  • Very detailed questionnaire--the best I've ever tried. You never have to worry about getting something you don't want!
  • 4-5 full-sized products hand-picked to match your preferences
  • Best For: Beauty fanatics, especially beauty professionals, who want exclusive products

Beauty Box 5--Makeup, hair care, skin care, nail care, fragrances and beauty accessories
  • 5 beauty samples--deluxe, travel, full-sized
  • $12 monthly with additional quarterly and yearly plans
  • Discounts on brands featured
  • Mixture of luxury, commonly known brands, niche brands, eco-conscious and even vegan brands
  • Best For: Beauty fans and beginners

PopSugar Must Have Box--Hand-selected items in beauty, fashion, home, fitness, and food
  • Full-size products and premium items
  • $39.95 a month
  • Best For: Those who want a little of everything. It's not a beauty box, but has something for everyone, so I had to include it!
    • My favorite "everything" box.

Ipsy--The longest sub I've had, since 2011!
  • Full-size and deluxe beauty samples in a themed bag
  • $10 month
  • Questionnaire
  • Active online community (for example, members will swap items)
  • Discount on brands featured
  • Point system with gifts offered at different point amounts
  • Best For: Makeup fans
So those are some of my fave sub boxes.
What are yours?

PS: GIVEAWAYS for YOU!
To thank you for supporting my blog, I have two giveaways I'd love for you to enter:

11.07.2013

Beauty Blunders: How to Stop Mascara on Lids (Video)


Every week in November, I'm sharing a quick video in which I answer some of my most-asked 
beauty questions. I hope you watch, learn, and enjoy!


Today's video is how to stop getting mascara on your lids. 
And I threw in a bonus tip of how to get rid of mascara on your lids. 
This 1 minute video can be viewed above, or click the link below:
Click here to subscribe to my YouTube channel, if you'd like.


Giveaway Time!

10.02.2013

Ask Elle: How To Avoid & Fix Cakey Foundation (Plus Video)


Have a beauty question you need answered on hair, makeup, skin, or nails?
Leave your question below or click here to Ask Elle.

Today I have 2 foundation questions I'm answering: 
  • How do I avoid "cake face?" 
  • How can I fix cakey-looking foundation?
Avoid Cakey Foundation:
  • Moisturize
  • Stipple
  • Sparingly Use Powder
Fix Cakey Foundation:
  • Clean Brush
  • Makeup Sponge

Want more tips and explanations to the highlights above?
Please watch the video below for the answer to those questions and more!!


What's your favorite foundation?

6.22.2013

Best ELF Brushes (Plus Video!)


This week has been so long! Has it flown by for you? A highlight of this week: an advance screening of The Bling Ring. I liked it! Something else I like? Helping y'all out with your beauty questions! I get a lot of questions about brushes, and while I've shared my Essential Basic Brushes, I wanted to give some picks for those of us on a budget (me), for those who are new to makeup, and those who don't use make up often. These brushes start at $1 (white handle) and then $3+ (black handle).

EYES
  • Liner Brush--Great for winged liner
  • Eyeshadow Brush--Small and perfect for travel, small hands/eyes, placing shadow on the lid, highlighting, contouring nose
  • "C" Brush--Bigger version of eyeshadow brush, Allure Magazine winner
  • Concealer Brush--Hides zits, veins, highlighting, and to get rid of polish mistakes
FACE

  • Kabuki--$6 but comparable to high-end brushes, powder, blush, bronzer, remove excess powder *Fave
  • Big and Small Stipple Brushes--For applying mineral makeup, thin foundations, blending, removing excess blush (big brush); blending concealer, applying highlight, cream blushes, contouring (small *fave)
  • Powder Brush--Powder, bronzer, foundation *Fave
And here's a video of where I go into more detail on each brush (Charlie cameo and outtake as well):


Disclaimer:

All products mentioned are purchased by me unless stated.
All pics, thoughts, etc, are mine unless otherwise noted. Publishing or redistributing any content from this blog is strictly prohibited. Please seek permission first. Thank you.


Related Posts Plugin for WordPress, Blogger...