Showing posts with label reader request week. Show all posts

4.18.2013

Reader Request Week: Q&A With ElleSees


Hey you! I had such a sweet and positive response to the first video that I decided to do another one. I'm thinking about making this a weekly thing. What do you think? I admit I wasn't feeling too hot in this one, so it's not as entertaining, but learning from my video mistakes and getting comfortable in front of the camera is what it's all about.

One of the possible entries in my $75 Sephora Giveaway is to ask me a question. I randomly chose 13 of them and made a video, so check to see if your question was answered! Enjoy!

Highlights:

  • Me, being awkward as usual
  • The Southern Accent Returns!
  • Charlie, who was asleep most of the video
  • The fact that I found an almond in my bra after filming (what the??)
I'm off to Waycross to see my youngest sister perform in her high school's version of Grease! I'll be back Monday with more tutorials and tricks. Have a great weekend. Be safe, behave, and be well. Love, Elle

PS: If you really want your question answered, or if you can't understand my accent, let me know in the comments. Thanks for watching!

4.17.2013

Reader Request Week: Easy Brown Smokey Eye Using 1 Drugstore Shadow

I had a lot of requests for this one! A smokey eye is just...sexy. I adore wearing this for a night out, and I seem to wear it a lot during summer. I love how it's brown, making it a little more wearable; uses one shadow that's $3; and it's easy. It is! Here we go:

is it summer yet?

Ok, the trick to a smokey eye is to create an ombre effect--you want it lightest at the crease and darkest at the lash line. While I'm doing my eyes lightest to darkest, feel free to work in reverse. I'm using the $3 Wet N Wild shadow trio in On Cloud Nine. I'm using only the matte brown shade. Seriously, pick this up!

Mega Length mascara $3, shadow trio $3, lipstick $3

1. Apply eyelid primer on the lid and underneath your bottom lashes to make sure your shadow stays.

2. Using a fluffy brush, sweep a very light layer of brown from upper lash line to crease.


3. Dip a flat shader brush into the brown and pat the color onto the lid only--not the crease.


4. With the fluffy brush, and using small circular motions, blend the light brown crease and the dark brown together at the crease. The blend up a little past the crease. Again, it should be lightest at the top.

5. Add a drop of water or saline solution to your flat brush and dip into the brown. This intensified dark brown shade will be applied in the outer corner and slighted dragged onto the upper lash line. Use the fluffy brush to softly blend out any harsh lines.


6. Use a pencil brush and smudge the brown along the lower lash line.


7. Add a brown or black liner to the water and tight lines. 

8. Add several coats of mascara after curling lashes.

9. Finish with a pink-nude lipstick/gloss. 


TIPS:
  • To make this a black smokey eye, use black on the lid and brown (or a coppery brown) in the crease.
  • Instead of using the wet brown shadow, feel free to use a matte black instead.
  • I added a little of my DIY Lip Butter onto my lips and lids for extra shine.
  • For that summer glow, add bronzer and highlighter.


4.16.2013

Reader Request Week: How to Wear Red Lips


Hi! This week I'm posting YOUR requests, in honor of my 3rd blogiversary. Enjoy!

There's just something so classic about a red lip. But it seems so intimidating to apply or to pull off. Today I'll show you it really is easy to wear a red lip. Just use the steps below:

1--Choose your product.
stains, glosses

Stains--These are the easiest to apply for that just-bitten, natural looking red. These can be dotted on the lips and rubbed in with a finger and the color is buildable. Plus, lip stains can be used for cheeks, too, making them a good value. The staying power depends on how much stain you apply.

lip balm stain, lip butters

Lipgloss and lip balm stains--These are also easy to apply, and can be applied to bare lips or over lipstick. The color payoff depends on the brand.

blue-based red is better for medium/darker skin tones, orange-based is better for fair skin

Lipstick--This is the one I'm focusing on for this post. Red lipstick can be matte or shiny. There are blue-based reds, orange-based, and "true" reds. I say to pick out a couple and see what shade looks best on you. Usually these can be returned to the store with a receipt (check beforehand). In general, blue-based reds are far too intense for fair skin. Orange-based reds tend to pop. I usually wear darker reds (wearing left lipstick as shown).


2--Exfoliate and moisturize
This step is crucial before applying any lipstick. I'm using the $3 lip exfoliator from ELF, but I make my own lip exfoliator. Then apply a lip balm and allow it to soak in for a minute.


3--Apply a base
Wipe off extra lip balm and apply a drop of creamy foundation or concealer. I use this as a "primer" to make sure my lipstick lasts.


4--Use matching lip liner
Outline lips and lightly fill them in with a matching lip liner.


5--Apply lipstick
I don't suggest applying red lipstick like you would Chapstick. Either use a lip brush to apply the color or dab the lipstick onto lips, gently pressing lips and then blending with your pinkie finger. A clear or matching red lip gloss can be applied, if that look is desired.


6--Clean up
Once you have the color how you'd like, it's time to clean up. Using a concealer or "everything" pencil, like this one from Studio Gear Cosmetics, outline outside of the lip to clean it up. This really makes the difference and helps with bleeding lipstick.


7--Blot and set
The easiest way to ruin a red lip is when it travels to teeth. Blotting will help stop this. Also, dust some translucent powder onto a tissue and blot lips with it to set the lipstick.

8--Eyes
With red lips, the rest of your makeup should be minimal (no red blush!!!). However, the eyes need to balance out the red lips. I use lots of mascara and a slight winged liner.


What's your favorite red lip product?



4.15.2013

Reader Request Week: Ombre Gel Nails With SensatioNail


ElleSees turned 3 last week (did you see the celebratory video? or enter my $75 Sephora Giveaway?) and I'm dedicating this week to YOU! I asked what posts you'd like to see, 
and I'm sharing them all week. Enjoy!

I'm a huge fan of gel (shellac) nails. They last for a couple of weeks, which I love. They're my must-do before traveling and they're fast. No smudges, either! I prefer to do them at home with a kit (better investment and no waiting at the salon). I find that they don't damage my nails--normally I'm changing my polish every couple of days, but with gel nails, the polish lasts, so there's no need to change my polish. Even my friends who aren't into polish on their fingers have been sold! I have friends who love just having shiny, clear polish or those who use the gel polish for pedis only. Therefore, I was delighted when SensatioNail sent me some new shades to try! I won a kit of theirs last year (see the original review here) and have purchased more shades since. These are the colors that I received:

Packaging and the two shades used

Jelly Sherbert, Scarlet Red, Island Oasis, Purple Orchid

These shades appear exactly as shown on the label. I love when a polish actually rings true to the bottle/label, don't you?

Since nail art was requested, I wanted to show a look that is really easy. I admit I typically exclude gel polish when I do nail art, but I wanted to show it can easily be done. And this was a great reminder of more versatility of gel polish! I'm creating ombre nails, totally inspired by my Lisa Frank sticker book I had as a kid. I loved the pink and purple combo!

First, make sure your nails are clean. Apply the gel primer--it dries in seconds. 
Next, apply a clear coat and place under the lamp for 30 seconds. The lamp will beep.


Choose your shade and apply. I used Jelly Sherbert. Place under the lamp for a minute. Make sure to cap the nails. Add a second coat if needed (mine didn't need it).


Using a makeup sponge, paint a small amount of Purple Orchid, and dab onto 3/4 of the nail. Depending on how you'd like the ombre effect, it should be darkest at the top (or bottom) and slowing fading into the pink. Place under the lamp for 1 minute. Repeat if desired.

Finish with another coat of the base/top coat, and place under the lamp for 30 seconds. Remove the sticky moisture layer with Gel Cleanser, and that's it!  Sensationail can be purchased in stores or online!


*Optional: I added a gel glitter polish to my thumb, before sealing with a top coat.
*Soak in acetone (they have a kit available for removal) to remove.
*More gel nail art: Christmas Glitter Gel Nails


4.20.2012

Reader Request Week: Ask Elle--All About Elle

To wrap up Reader Request Week, I thought I'd do a Q&A:


What's the one thing you would most like to accomplish in your life?
By Heather 

  • When I was 18, I made a 30x30 list. I completed everything (and more) on that list, except get married/have kids and learn to drive a stick shift (manual). So those!

What is the WEIRDEST product you've ever used???
By Jax 


My question is: If you could describe yourself in just one word, what would it be?
By Heather 

  • Caring

Hi Elle! Could you possibly do a post on how to use the Sunsilk Straighten Up? 
By Theresa 

  • It's not a product that's readily found in stores anymore (sad face), but I use it as I would any serum/cream. I put it in my wet hair and comb through. It helps straighten, soften my hair, defrizz it, and get the waves out. I still can curl it though. I either blow dry or air dry and then style as usual. Regardless, I'd have to use heat though.

Subjects like why you blog, where you grew up, who taught you how to be feminine?
By Shybiker 

  • I blog because I feel like I'm helpful. I love the community and kinship I feel here.
  • I grew up in Waycross, GA...a small South Georgia town. I always had mixed feelings about growing up in a small, judgmental town, but looking back I wouldn't change it.
  • My paternal Grandmother & my paternal Great Granny (Sugar) and of course, my mom & sisters.
  • My Grandmother (still) runs a beauty shop, so growing up around makeup and getting my hair done was my norm. Fun!
  • My Sugar owned a dress shop in the 70s, and seeing all of her clothes and costume jewelry definitely left an impression!

Here's a question - what are some ways to get rid of puffy eyes from lack of sleep, crying, etc.--
Krysten @ Why Girls Are Weird


I would like to know how you were published in a real live magazine! I think it's such an amazing accomplishment and I want to hear more--Laura

  • Thank you!!! It's been a dream of mine and I still can't believe it. The magazine contacted me--as simple as that! Seriously, that's what happened. The hardest part was waiting, and telling people for months it was gonna happen. And it finally did! For the most part, the response has been positive. I have encountered that haven't been supportive (Oh, that must be a local magazine or something. You? Why? Her blog sucks, mine's better etc). I've been tickled when friends/fam from all over the country send me pics of them with the magazine. My friends even threw me a surprise party to celebrate!


"Post more pics of yourself!"-- a lot of y'all!
  • Ok.
obligatory bathroom pic, braves game, do use while driving
australia, well, um, it's me, cancun
obligatory b&w bathroom pic, me? in stripes? you must be kidding, serious dancer

Anything you'd like to know? Comment!
And I'll update this post.


Spectacular, fastanstical, amazing, stellar giveaway!!!!!!!!!!!
Seriously.
It's good.
I'd want to win it.
There will be four winners.
This is not a poem.


4.19.2012

Reader Request Week: How To: Pink Smokey Eye for Prom

All week I'm sharing posts that YOU, my wonderful readers, have requested.
If you follow me on Twitter or Instagram, you got an early peep!
Today is a requested affordable pink smokey eye for a reader's daughter's prom.
Also, from Shea who wanted a beauty look.
Enjoy!

T O O L S:
  • Eyelid Primer (I used ELF, $1)
  • Wet N Wild palette in I'm Getting Sunburned ($2.99, drugstores, online)
  • WOW Mascara from Rimmel ($3, drugstores, online)
  • Flat, pencil, fluffy, smudge brushes (Mine are from ELF and Coastal Scents, $2-3)
    • Optional: 
    • Wet N Wild palette in Walking on Eggshells (to use as highlight/under brow)
    • Lash curler (mine's from Shu Uemera, but there are plenty of excellent cheap ones)
    • False lashes

M E T H O D:
  • DISCLAIMER: I'm only able to take pics for the blog at night, so my pictures never show the true color, no matter what I do. The pink doesn't show up as pretty as it is, not does the smokey eye. ARGH! Help? Tips?
  • To keep color on lids all night at prom, use an eye lid primer.
  • Pat the shiny pinky/purply shade from the I'm Getting Sunburned palette all over lid with a flat brush.
  • Using a pencil brush, dip in the brown glittery shade, and make a sideways V in the outer corner.
  • Blend the brown using a fluffy brush.
  • Dip the smudge brush into the brown and smudge under lower lashes. Use what's remaining on the brush on the upper lid. Blend the upper lid smudge with a fluffy brush.
  • Curl lashes and apply as many coats of mascara as desired.

T I P S:
  • No brushes? Pat the pink shadow on with your finger. Use the pointy edge of these cotton swabs to apply the brown shade in a V-shape. Blend with cotton swabs or finger.
  • Use the lightest shade in the Wet N Wild palette Walking on Eggshells to highlight inner corners and under brow. Take the darkest brown shade to blend between the sparkly dark brown and the pink, if needed.
  • No eye lash curler (you seriously need one!)? Run a spoon under hot water and use it to curl your lashes.

Any personal questions for Elle Sees? Let me know, below.


SUPER FANTASICAL GIVEAWAY WITH MULTIPLE WINNERS TOMORROW!

4.17.2012

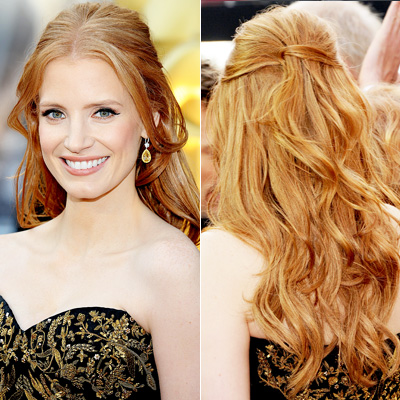
Reader Request Week: How To: Inspired by Jessica Chastain's Oscar Hair

Today on Reader Request Week, we're featuring an inspired celeb hairstyle. It's so pretty and a fave of mine. The lovely Jenny at Spry on the Wall requested this beautiful hairstyle, worn by Jessica Chastain at the Oscars.


It's a classic, easy-to-achieve look. Let's get started:

T O O L S:
  • 2 inch curling iron
  • bobby pins
  • teasing comb/brush
  • hair spray
  • heat protectant
  • styling paste 
M E T H O D:
  • Spray heat protectant on dry/damp hair and allow to dry.

  • Begin wrapping 1 in sections around the barrel and hold for 10 seconds.
  • Once curls have cooled, put your thumbs right above both ears and scoop up hair.
  • Using a teasing comb/brush, tease that section.
  • Separate pieces in the front, around the face.
  • Take a piece from the teased section and wrap it around the rest of the teased section, like in the photo. It's similar to a mini-French twist.
  • Pin it all back with bobby pins. I used 3.
  • Rub some styling paste in your hands and run it through curls--I would pick a few pieces to define them.
  • Spray down flyaways and pat down hair with hair spray.
  • Use a curling iron to curl the two pieces in the front, away from the face, if needed.
Me, trying to recreate Jessica's pose, but looking like a Glamour Shot instead!


Have a request you'd like to see? Let me know, below.


4.16.2012

Reader Request Week: Elle's Hair Routine


Welcome to Reader Request Week! In honor of my 2 year blogiversary (thanks for the sweetest wishes ever!), I asked what YOU wanted to see on the blog. I took those topics and made them into a week's worth of posts. Enjoy!

PS: If there's something you'd like to see, or a beauty question you'd like answered, OR general questions about me, let me know below!

The number question I get asked is about my hair. I consider this awesome because (a) my hair is the one physical thing I like about myself (b) it's the one thing I will spend money on! So let's get into my hair routine:

elle sees' hair care routine


Dye & Cut:
  • I had my first grey hair at 20, so I get my hair dyed (sometimes by me) its natural color. In the spring/summer, I do very natural highlights. I try to stretch out the dying process as long as possible to save money.
  • I get it trimmed every other hair appointment, so maybe every couple of months or so. My hair grows fast, and I've had it all lengths. Right now, I'm loving it longer, with face-framing layers, since I feel there's only so many years I can rock hair. I'm not young, ya know!
Wash & Condition:
  • My hair texture is wiry, slightly wavy, and dry. Since it's so dry, I wash it once or twice a week. I know that sounds gross to most people, but it dries my out hair and makes it frizzy. It rarely gets greasy and I've trained it to be this way. All of this, of course, depends on the time of year and activities. If I'm at the beach, for example, I've gotta wash my hair every day.
  • I use a shampoo for colored hair. Today I'm using L'Oreal Ever Pure.
  • I almost always use Aussie 3 Minute Miracle. It smells so good & it works for me always.
  • Every other shampoo, or if my hair has been exposed to a lot of heat, I'll use a hair masque. Today it's Dove's Intensive. Repair Deep Repairing Mask. I use natural products too. Check out my past hair masques here, here, here, and here...coconut oil is a fave too.
Wet Hair Care:
  • I brush my hair before getting in the shower. I also keep a comb in the shower to comb through the conditioner/deep conditioner/masque.
  • Once I'm finished, I gently squeeze out excess water and put my hair in a towel or air dry for about 20 minutes.
  • Then I apply Sunsilk's Straighten Up--they don't make this anymore), but it smells and works great. It also has heat protectant in it. 
  • I comb it through and let my hair air dry, preferably over night. Never use a brush on wet hair.
Dry Hair Care:
  • I try not to do two heat processes in my hair in one day, but sometimes it's just not possible. I wait until my hair is 70% dry, and using the nozzle on my Hana hair dryer, I'll attempt a blow out with a big round brush. If I just randomly blow dry it, my hair will be ginormous. It takes about 30-40 minutes to do a quality blow out, 10 minutes for a quick & dirty blow dry, or 8-10 hours to dry au naturale.
  • I'll spray heat protectant, like Tressame, before using a curling iron/flat iron. 
  • I use a bristle brush to brush my hair, from Sally's Beauty.
  • I rarely use hair spray. I don't need it. My hair will hold curl for a week, and most hairspray is alcohol-based, and anything with alcohol will frizz my hair. L'Oreal has a line of alcohol-free based hair products that I've been loving.
Other Products Used on Occasion:
  • Dry Shampoo (I love Oscar Blandi, Dove, and Suave).
  • Root Booster (L'Oreal alc-free, Got 2B powder)
  • Hair Spray (L'Oreal alc-free, Elnett, Garnier)
  • Styling Paste (Garnier Surf Wax)
  • Leave In Conditioner (homemade or It's a Miracle 10)
The Quick Version:
  • Wash weekly or biweekly
  • Deep conditioner weekly
  • Hair masque bimonthly
  • Apply straightening/anti-frizz product on damp hair.
  • Allow to air dry, if possible. If not, do a blow out or quick & dirty dry.
  • Apply heat protectant, straighten/curl/etc and style.
Natural, no-product, air-dried hair!

Got hair questions? Need more explanation? Let me know, below!


Congrats to SARAH DINKLE, who won the Sneakpeeq giveaway!

Disclaimer:

All products mentioned are purchased by me unless stated.
All pics, thoughts, etc, are mine unless otherwise noted. Publishing or redistributing any content from this blog is strictly prohibited. Please seek permission first. Thank you.


Related Posts Plugin for WordPress, Blogger...